Saturday, May 30, 2020

How To Compile And Run Java Programs Using Visual Studio Code

run_compile_java_program_using_visual_studio_code

In the previous article, I explained how to compile and run Java programs with CMD on Windows 10. Now, this post will provide a fast way to compile and run Java programs with Visual Studio Code.

Before I give further explanation, make sure you have read my previous article here. And please note that Visual Studio Code (referred to as VS Code) which I mean here is different from Visual Studio which can be used to create applications for various purposes of app development. VS Code is a light version of Visual Studio. VS Code is a cross-platform Code Editor created by Microsoft for Windows, Linux, and macOS. VS Code is also one of the Text Editor widely used throughout the programming world.
Download and Install VS Code


Open your browser, then navigate to the following link, http://www.code.visualstudio.com. Next, please download the VS Code according to the operating system you are using. When download is complete, install it like a normal desktop application.

How to Quickly Compile and Run Java Programs with Visual Studio Code


Open the VS Code program then type the java program code below. Then save it with the name HelloWorld.java. In this tutorial, I saved it in the D:\LearningJava directory.

public class HelloWordl {
  public static void main(String[] args) {
    //Displays a String
    System.out.println("Visit https://www.codingforjava.com");
    System.out.println("Thank You!");
  }
}

Using CMD Shortcuts
In the VS Code main view, press the F1 key or the Ctrl + Shift + P combination to open the command palette. Then you type the command and select Open New Command Prompt to open cmd which by default opens in the active directory of your Java file. Or, you can also use the shortcut Ctrl + Shift + C, and cmd will open immediately.

Using the Integrated Terminal
This method is almost the same as the previous method above. You can also use the integrated terminal to do all the commands in cmd, such as cd to change directories, javac for compile and java to run. You just need to press the Ctrl + ` (backtick) button, and the integrated terminal has appeared at the bottom of your VS Code. (note: backtick button is located to the left of the number 1)

vs_code_integrated_terminal


Using Java Debug Extensions
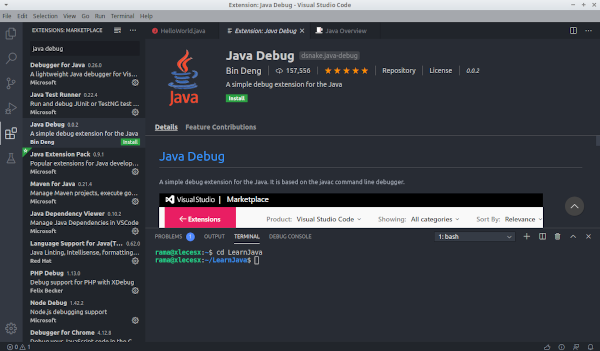
In my opinion, this is a very easy way. But you have to install the additional VS Code extension first. Here's how, press the Ctrl + P, then type ext install java-debug, then enter. Next, in your left sidebar, there will be several options available in the VS Code Marketplace. Select Java Debug published by Bin Deng (see details), then click install. Wait a few moments, click enable and restart your VS Code.

simple_java_debug_vscode_by_bin_deng


To use the extensions is quite easy, here are 3 main commands that will be used:
  • Ctrl + Shift + U = to display the output section.
  • Alt + C = Shortcut for compile (same as javac command)
  • Alt + R = Shortcut for run (same as java command)
Using Code Runner Extensions
This is one of the extensions that can be used for several other programming languages besides Java, such as C, C ++, JavaScript, Python, and so on. This is also one easy way to compile and run Java programs.

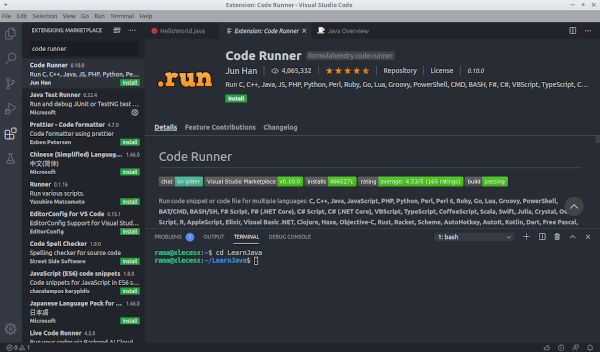
Using this method is very easy. Press Ctrl + P, then type ext install code-runner, then enter. Select Code Runner published by Jun Han (see details), then click Install and activate.

code_runner_vscode

3 ways to use these extensions include:
  • First, open the command palette by pressing F1 or Ctrl + Shift + P. Then type in run code, then enter.
  • Second, use the shortcut Ctrl + Alt + N.
  • And finally, just right-click on your workspace, and select Run Code.
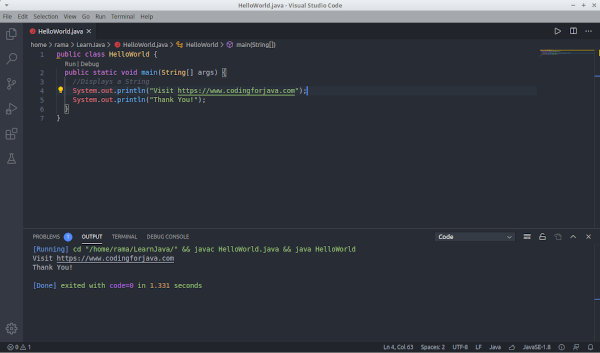
Following is a display of compiled and run Java programs using code-runner extensions.

running_java_code_vscode

So which method do you think is the easiest? Let us know if you also have other easy ways to compile and run Java programs with Visual Studio Code. If you are having difficulties, feel free to ask us through the comments at the end of the article. Hopefully, this article is useful. thanks.

Wednesday, May 27, 2020

Float and Double Data Type Java Language With Example

float_double_java

Float and double data types are fractional number data types. This time we will discuss the difference between float and double in java programming.

Definition of float and double data types in java language


Float and double data types are used to hold fractional numbers such as 3.14, 44.53, or -0.09876. Just like programming languages in general, we use periods as separators of integers and fractions.

The difference between float and double lies in the range of numbers and the level of accuracy. The following table is the difference between float and double data types in Java:

Although float and double data types can store very large numbers, but this data type has general weaknesses as is the case in every programming language (not only Java). That is the level of accuracy. This relates to the mechanism of storage in computers that use binary numbers.

Example of java and float program code examples.

As the first example java code, I will create 2 variables of type float and double, input numbers, then display them:

class HellWorld {
  public static void main(String args[]){
     
    float  var1;
    double var2;
 
    var1 = 234.45F;
    var2 = 234.45;
     
    System.out.println("var1 = "+var1);
    System.out.println("var2 = "+var2);
  }
}

Program code results:

var1 = 234.45
var2 = 234.45

At the beginning of the program code, I declare a variable var1 of type float, and variable var2 of type double. Then in lines 7-8, these two variables are filled with numbers 234.45.

Notice how to fill in the variable var1, there is a suffix "F", i.e. 234.45F. This is necessary because by default all fractional numbers in Java are considered double.

Finally these two variables are displayed with the System.out.println() command in lines 10 and 11.

The suffix "F" for this float data type input process must be written, otherwise there will be an error like the following example:

class HelloWorld {
  public static void main(String args[]){
     
    float  var1;
    double var2;
 
    var1 = 234.45;  // an error occurred here
    var2 = 234.45;
     
    System.out.println("var1 = "+var1);
    System.out.println("var2 = "+var2);
  }
}

java_float_error_compiler

In this case the Java compiler refuses because there is a conversion process from double to float.

Writing fractional numbers can also use scientific notation, such as 3.12e2 or 4E-3. The character e or E represents the rank of 10, so 3.12e2 = 3.12 x 102 = 312. Whereas 4E-3 = 4 x 10-3 = 0.004. Here is an example:

class HelloWorld {
  public static void main(String args[]){
 
    float var1;
    double var2;
 
    var1 = 3.12e2F; 
    var2 = 4E-3;
 
    System.out.println("var1 = "+var1);
    System.out.println("var2 = "+var2);
  }
}

Program code results:

var1 = 312.0
var2 = 0.004

How to read (input) Double and Float Data


To input double and float data type processes, you can also use the Scanner class by using the following input commands:
  • nextFloat ()
  • nextDouble ()
Also to avoid punctuation problems, this input process should also include the Locale class. Here's an example:

import java.util.Scanner;
import java.util.Locale;
 
class HelloWorld {
  public static void main(String args[]){
     
    Scanner input = new Scanner(System.in).useLocale(Locale.US);
     
    float  var1;
    double var2;
 
    System.out.print("var1 (float): ");
    var1 = input.nextFloat();
     
    System.out.print("var2 (double): ");
    var2 = input.nextDouble();
     
 
    System.out.println();
    System.out.println("## Result ##");
     
    System.out.println("var1 = "+var1);
    System.out.println("var2 = "+var2);  
  }
}

java_float_double_input_example

At the beginning of the program code, there is a code for importing java.util.Scanner and java.util.Locale. This Locale class is needed during the Scanner class initiation process inline 7. It functions so that the input process uses the American system (US), which uses a dot as a fraction separator.

So to be uniform, we just set it with the US system. The reading process itself is carried out in lines 13 and 16 for the float data type and double data type.

So, should you use float or double data types?


For general use, you should only use double. Aside from being larger in scope, double is also the default fraction data type from Java, so we don't need to add the "F" suffix when we want to fill values into variables.

Saturday, May 23, 2020

How To Install Android Studio

new_android_studio

At present, a lot of smart electronic devices are driven by the Android operating system. The most significant use is on smartphones. Android is a Linux-based operating system developed by Google. The massive number of android users is certainly a good opportunity for developers to provide applications for the operating system.

If you already familiar with the programming language, of course know how to work with Eclipse IDE for Java developers. However, to develop an Android application, you are strongly advised to use Android Studio. Here's how to install Android Studio:

  1. Android studio overview
  2. Android studio features
  3. Why use android studio?
  4. Things you need to be prepared to install android studio
  5. How to install android studio

Android studio overview


Before going to the section on how to install Android Studio, we start by getting to know this amazing IDE. So, in 2013, Google announced the presence of Android Studio. However, only in 2014 Google officially released Android Studio in beta as the Integrated Development Environment (IDE) for Android application development.

The use of Android Studio certainly maximizes the performance of developers in developing their best applications since it focuses on the Java programming language. Unlike the Eclipse IDE which includes various programming languages.

Until now, Google has developed several versions of Android Studio. As of this writing, the latest version is Android Studio 3.6.3. This latest version is supported with various features to optimize the performance of Android Studio. While the older version is Android Studio 2.3, 3.0.1, 3.0.4, and others.

With Android Studio, you can create attractive interfaces and manage files easily. You can also have direct access to the Android Software Development Kit (SDK) so that the application can run smoothly on all versions of Android devices.

Simply put, you only need to write, edit, and save the worksheet along with the required files. At the time of the coding process, Android Studio will advise on the relevant codes.  That way, you can save time when coding.

Android studio features


Here is a list of Android studio features:

  • The drag-and-drop layout editor.
  • Powerful emulators with various features.
  • Dynamic Gradle-based version system.
  • The Template feature helps you determine Android designs and components.
  • ProGuard integration.
  • Lint Tools support to check performance, version compatibility, usability, and other problems.
  • The Refactoring feature serves Android-specific flash repairs
  • Support C ++ and NDK.
  • Integrated with Google Cloud Messaging and App Engine.
  • Supports for Android TV and Android Wear applications.
  • The Android Studio Environment is simply designed to make it easier to develop Android applications.

Why use android studio?


With a myriad of features offered by Android Studio, so Google makes it the official IDE for android application development. However, you can also use other Android development according to your abilities. Here are two alternative Android development:

Xamarin
Xamarin can be chosen if you are familiar with C# Language. This software developed by Microsoft will help you to become a capable mobile developer.

Ionic
Ionic was developed to help web developers who want to expand into the world of mobile developers. By using ionic, we can create Android applications with web technology.

Things you need to be prepared to install android studio


Before you rush to download and install Android Studio, make sure the JDK has been installed before. Read here on How To Install Java JDK and JRE. Next, pay attention to some things related to hardware compatibility to install android studio. Below are the things that need to be prepared before installing android studio:

Windows
Android Studio can operate with Windows 32- and 64-bit versions, 7.8 or 10. Windows users who want to install android studio must make sure their device has the following requirements:

  • The minimum computer screen resolution is 1280 X 800.
  • Make sure the available disk space is not less than 2GB (500MB for IDE and 1.5GB for android SDK and image system emulator). However, we recommend that you set aside 4GB of space so that your windows device continues to run smoothly.
  • Make sure the device is supported with at least 3GB or 8GB of RAM. 1GB of RAM will be used for the android emulator.
  • The 64-bit operating system and Intel® support Intel® VT-x processor, Intel® EM64T (Intel® 64), and Execute Disable (XD) Bit functionality are useful for acceleration emulators.

Mac OS
For Apple users, make sure the following are met:

  • Make sure your device is using the Mac® OS X® 10.10 (Yosemite) version or above.
  • Minimum screen resolution of 1280 x 800.
  • Minimum RAM of 3GB. However, it would be better if 8GB with an additional 1GB for the android emulator.
  • Provide a minimum of 2GB of disk space with an estimated usage of 500MB for the IDE and 1.5GB for the android SDK and emulator system.

Linux
The following requirements must be met when wanting to install Android Studio on Linux:

  • Linux-based computers must have a GNOME or KDE desktop that has been tested by Ubuntu® 12.04, Precise Pangolin (a 64-bit distribution capable of operating 32-bit applications).
  • Also make sure the device is supported by GNU C Library (Glibc) version 2.19 or updated version.
  • The screen resolution must also be 1280 X 800
  • Provide at least 2GB of disk space.
  • Android Studio requires a minimum of 3GB. But we recommend using 8GB of RAM so that Android Studio runs smoothly. Do not forget to add 1GB of RAM which will be used for the Android emulator.
  • For emulator speed, at least Intel® Processors with Intel® VT-x support, Intel® EM64T (Intel® 64), and Execute Disable (XD) Bit functionality, or AMD processors with AMD Virtualization ™ (AMD-V ™) support are needed.

How to install android studio


After your hardware device meets the above requirements, it is time for you to know how to install Android Studio. Here we will describe how to install Android Studio:

  • Visit the official Android studio website at https://developer.android.com/studio to download the latest installer file. Check the mark for agreeing to the terms and conditions so that Android Studio can be downloaded. Then you can follow the instructions until the download process is complete.
  • After the download is complete, run the installer file. The file will automatically be verified so wait until the process is complete.
  • On the Setup menu, click next to install Android Studio. Then in the Choose Component menu, check Android Studio, Android SDK, and Android Virtual Device then click next.

  • Setelah memilih semua komponen yang akan diinstal, lanjut ke jendela License Agremeent. Klik saja pada kotak I Agree.
  • Tahap selanjutnya adalah tentukan lokasi penyimpanan Android Studio beserta SDKnya. Secara default, file instalasi tersebut akan tersimpan di Local Disk (C).

  • Next, click install. Check the Do not Create Shortcuts option if you want.

  • Wait until the installation process is complete. Click next and click finish while the Android Studio Start menu is still checked.

  • In the next window, there are 2 options. The first choice is for those who have previously installed the Android Studio IDE. If you have never installed it, then check the second option. Don't forget to click OK so you can move to the next process.
  • When you check the second option, then you will see a Welcome window. Choose the next menu.
  • After that, select the standard type install option then click next.
  • Then, the SDK Components Setup window will appear. There are several SDK components to choose from. Just check the components to be installed then click next.
  • The next step is Verify Settings. Click finish and the component download process will begin.
  • After the download process is complete, it means that the installation of Android Studio is complete. Therefore click finish.
  • After a long installation process, you will be greeted with a Welcome to Android Studio window. Now, you can run it.

That's the full review of Android Studio and how to install Android Studio. Android Studio is the official Android development from Google. Android developers, both beginners and experienced, are expected to be able to create various types of Android applications using this IDE.

Friday, May 22, 2020

Integer Data Type Java Language With Example

integer_data_type_java

Today, we will discuss the understanding and how to use Integer data types in java programming language.

Understanding the Integer Type of Java Language


Integer data types are data types used to hold positive or negative integers, such as: 4, 30, and -1234. There are 4 sub-types of integers which are distinguished based on the range of numbers in the Java language:

  • byte
  • short
  • int
  • long

The following table summarizes the range of each integer data type in Java:
Data Type Storage Memory Size Range
byte 1 byte -128 to 127
short 2 byte -32,768 to 32,767
int 4 byte -2,147,483,648 to 2,147,483,647
long 8 byte< -9,223,372,036,854,775,808 to 9,223,372,036,854,775,807

Memory Storage Size is the amount of memory needed to store these numbers. The greater the range, the more memory space is needed.

The Java language also does not recognize unsigned integers like in C or C ++ languages. Unsigned is a way to sacrifice negative values to increase the range of positive numbers. That is, in Java integer data types will always have negative and positive numbers.

Example Code Program Data Type Java Integer Language

In the following program code below, I use the 4 integer data types:

class HelloWorld {
  public static void main(String args[]){
     
    byte  var1;
    short var2;
    int   var3;
    long  var4;
 
    var1 = 120;
    var2 = 32000;
    var3 = 1000000000;
    var4 = 1000000000000000L;
     
    System.out.println("var1 = "+var1);
    System.out.println("var2 = "+var2);
    System.out.println("var3 = "+var3);
    System.out.println("var4 = "+var4);    
  }
}

In rows 4 - 7, there are four variable declaration processes with different integer data types, namely byte data types for var1, short for var2, int for var3 and long for var4.

These four variables are then assigned with the values in lines 9-12, and then displayed with the System.out.println() command in lines 14-17. The following results:

var1 = 120
var2 = 32000
var3 = 1000000000
var4 = 1000000000000000

Var4 with long data type, the filling process must add the character "L" at the end, i.e. var4 = 1000000000000000L.

This additional "L" character is required because by default integers in Java are considered int. Long data types without the addition of "L" will produce an error:

class HelloWorld {
  public static void main(String args[]){
     
    long  var4;
 
    var4 = 1000000000000000;
     
    System.out.println("var4 = "+var4);    
  }
}

Error Message:

data_type_java_error

Writing Binary, Octal and Hexadecimal Numbers in Java


For certain purposes, sometimes we need to process numbers in binary, octal, and hexadecimal number systems. This can also be accommodated by Java language integer data types.

Binary is a designation for a number system consisting of 2 digits, namely 0 and 1. To input this number, add the prefix "0b" before writing the number, such as 0b10100100.

Octal is a number system consisting of 8 digit numbers, i.e., 1, 2, 3, 4, 5, 6, and 7. To make octal numbers in Java, add the prefix "0" before writing numbers, such as 0244.

Hexadecimal is a number system consisting of 16 digit numbers, i.e. 0-9 and the letter A-F. To make hex numbers in Java, add the prefix "0x" before writing numbers, like 0xA4.

Also, the everyday number system, which is 10 digits 0-9, is called a decimal number.

Here is an example program code for writing binary, octal, decimal and hexadecimal numbers in Java:

class HelloWorld {
  public static void main(String args[]){
     
    int var1, var2, var3, var4;
 
    var1 = 0b10100100;    // binary literal
    var2 = 0244;          // octal literal
    var3 = 164;           // decimal literal
    var4 = 0xA4;          // hexadecimal literal
     
    System.out.println("var1 = "+var1);
    System.out.println("var2 = "+var2);
    System.out.println("var3 = "+var3);
    System.out.println("var4 = "+var4);    
  }
}

Program code results:

binary_octal_decimal_hexadecimal_java

In the program code above, I created 4 variables: var1, var2, var3, and var4 which are all set as int data types. Then in lines 6-9 these four variables are filled with numbers 0b10100100, 0244, 164, and 0xA4.

When the program results are displayed, all variables will be converted into decimal numbers. This means, binary numbers 10100100, octal 244, and hex A4 are all converted to 164 in decimal numbers.

Note: be careful with writing numbers with the leading zero, like 0123. If you write like that, then Java thinks it's a number 123 in octal format, and not the same as a decimal number 123.

In programming, Literal is a meaningful term "written directly". For example, 123 is an integer literal, 123L is a long literal, 0b10100100 is a binary literal, etc.

How To Read (input) Integer Data


The process of reading data in Java can use the Scanner class. Specifically for integer data types, the commands used for this reading process are:

  • nextByte()
  • nextShort()
  • nextInt()
  • nextLong()

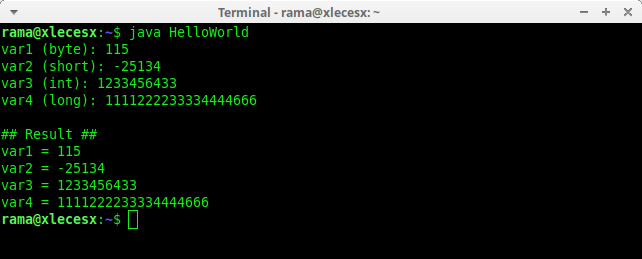
The following is the program code for reading numbers (integers) in Java:

import java.util.Scanner;
 
class HelloWorld {
  public static void main(String args[]){
     
    Scanner input = new Scanner(System.in);
     
    byte  var1;
    short var2;
    int   var3;
    long  var4;
 
    System.out.print("var1 (byte): ");
    var1 = input.nextByte();
     
    System.out.print("var2 (short): ");
    var2 = input.nextShort();
     
    System.out.print("var3 (int): ");
    var3 = input.nextInt();
     
    System.out.print("var4 (long): ");
    var4 = input.nextLong();
     
    System.out.println();
    System.out.println("## Result ##");
     
    System.out.println("var1 = "+var1);
    System.out.println("var2 = "+var2);
    System.out.println("var3 = "+var3);
    System.out.println("var4 = "+var4);    
  }
}

java_read_integer_data

Just like before, for this program code I declare 4 integer data types in lines 8-11. Then for each variable, we take the values from user input.

The process of reading data is done by Scanner class between lines 13-26. After the data reading process, the value is displayed at the end of the program.

In this tutorial we have discussed the definition of Java language integer data types, including how to write binary, octal, and hexadecimal numbers, and the process of reading data (input) integer data types.

Wednesday, May 20, 2020

Java Keywords, Identifiers and Access Controls

Java_Keywords

A java application is a group of classes that talk to each other by executing other class methods and sending messages by entering parameters into the method. In this section we will learn about java keywords, identifers and the concept of access control.

What is java keyword?


Java only has 44 keywords. All of these keywords belong to the Java language. So, we must use it correctly and should not be used for other purposes, for example as variable names or class names.

The following is a list of 44 java keywords:
abstract Boolean break byte case catch
char class const continue default do
double else extends final finally float
for goto if implements import instanceof
int interface long native new package
private protected public return short static
strictfp super switch synchronized this throw
throws transient try void volatile while
assert enum

Some keywords are quite familiar in all programming languages, so there is no need to explain in detail.

What is java identifiers?


Identifers are names that can be declared in java but are not part of the java keyword. Java identifers include: classes, interfaces, variables/properties and methods.

The procedure for naming identifers in java is governed by several rules:
  • The rules of the compiler to determine whether the name identifers are allowed or not.
  • Java Code Convention from Sun.
  • JavaBean naming standard.
We will discuss one by one the rules above.

The rules of the compiler about naming identifiers are very clear because there will be an error at compile time if this rule is violated.

Following are the naming rules for identifiers used by compilers:
  • All java keywords may not be used as identifiers.
  • Identifiers must begin with a letter, a dollar symbol ($) or an underscore connecting character (_). Numbers cannot be used as the first character identifiers.
  • After the first character, the next may be followed by letters, dollar symbols, connecting characters, and numbers.
  • There are no restrictions on the length of identifiers.
  • Java identifiers are case-sensitive, foo and Foo are two different identifiers.
  • The public class name must exactly match the name file .java
The following are examples of allowed identifers:
  • int _x;
  • int $y;
  • int ___17_r;
  • int _$;
  • int this_is_identifiers_name;
Here is an example identifers which is not allowed by the java compiler:
  • int 123test_test;
  • int x#;
  • int x:;
  • int x:;
  • int .point;
The Java Code Convention is a collection of "unofficial" rules made by Sun. One part of the Code Convention discusses how to name uniform identifiers. The Java Code Convention was created because research states that the effort to write code (development) is only around 20%, while 80% is used to maintain the code and add new features to the application. This prompted Sun to develop the Java Code Convention to make java code readable and maintained.

Following are some of the conventions used in the Java Code Convention:
  • Classes and interfaces always start with a capital letter. Every word always starts with a capital letter. This style is commonly called the "Camel Case". For example: Runnable, HashMap, ArrayList, and so on. Also, classes must be nouns, not adjectives or verbs.
  • Methods always start with a lowercase letter. Every word after the first letter starts with an uppercase letter. The method must be a verb to indicate that this is doing an activity/action. For example: getIndex, setIndex, println, paint, and so on.
  • Just like methods, variables using camel cases start with lowercase letters. Variables should be short, clear, sound good, and nouns. For example: index, length, width, firstIndex, and so on.
  • Constants in java are created by declaring a variable as static and final. All letters are uppercase letters separated by underscore (_) symbols. For example: FRAME_WIDTH, ERROR_MESSAGE, and so on.
The JavaBean concept was created by Sun as the basis of components in java applications. The use of JavaBean by IDEs such as NetBeans is to make Swing components visually manipulated.

Modern frameworks such as Spring and EJB have also adopted the concept of JavaBean, so the term JavaBean often appears in the documentation of this framework. Spring uses the term bean instead of JavaBean, but technically they are the same.

To understand the concept of JavaBean, there is a term called Properties. Basically, a property is an instance variable that is directly below the class, whose access modifer is private. Since it is private, a method must be made to access properties from outside the class. The method for accessing properties is usually referred to as a getter and the method for changing property values is called a setter.

The following rules for naming methods are used to access the properties (getter setter) of JavaBean:
  • If the data property type is not boolean, then the method for accessing properties starts with get. for example getWidth, getSize, getIndex and so on.
  • If the data property type is boolean, then the method for accessing properties starts with is. For example isEmpty, isRunning and so on.
  • All setter methods must start with a set. For example setSize, setIndex, setWidth and so on
  • The method name is derived from the variable name that is given the prefix get, set, or is. Camel case writing rules apply to the getter and setter methods.
  • Setter methods must be public, return void with one parameter whose data type is exactly the same as the variable data type.
  • Setter methods must be public, return data types that are the same as variable data types, and without parameters.
  • JavaBean must have a default constructor, that is, a constructor that has no parameters at all.

Java Access Modifier


Access Modifier is an "access right" given to a variable, method or class that aims to maintain the integrity of data when it wants to be accessed by other objects. The access right is given by the program maker. With the Access Modifier, we can limit which resources can be accessed by certain objects, their derivatives, or by certain methods.

In the Java programming language, there are four types of modifiers can be used for variables, methods and classes. The following is a table that briefly explains the types and levels of permissions on the modifier:
Modifier Class Package Subclass World
No Modifier  Y (Accessible)  Y (Accessible)  N (Not accessible)  N (Not accessible)
public  Y (Accessible)  Y (Accessible)  Y (Accessible)  Y (Accessible)
protected Y (Accessible) Y (Accessible)  Y (Accessible)  N (Not accessible)
private Y (Accessible) N (Not accessible) N (Not accessible)  N (Not accessible)

Public access modifier means that it can be accessed by anyone without restrictions.

Notice the example below:

The fruit class is declared public and within the com.mypackage package.

package com.mypackage;
 
public class Fruit {
 
 private String name;
 
 public void setFruitName(String fruitName) {
  this.name = fruitName;
 }
 
 public String getFruitName() {
  return name;
 }
 
 public void showMessage(){
  System.out.println("The name of the fruit is: " + getFruitName());
 }
 
}

Then the FruitTest class is in the test package as below.

package test;
//import statement to use classes outside the package
import com.mypackage.Fruit;
public class FruitTest {
    public static void main(String args []){
        Fruit fruit = new Fruit();
        fruit.setFruitName("Grape");
        fruit.showMessage();
    }
}

Note that the Fruit.class must be declared public so it can be used by the FruitTest.class where it is in a different package. If this is not the case, then the Fruit.class is considered to have a default access modifier where it can only be accessed in the same package. So an error occurs stating that the Fruit.class is "not visible".

Protected means that it can be accessed inside the package or outside the package but only through inheritance which is one of the important concepts of java programming.

Protected cannot be applied to classes, but can be applied to data fields, methods and constructors.

Consider the following simple example:

The Fruit.class resides in the com.mypackage and applies the protected modifier to the showMessage(); method.

package com.mypackage;
 
public class Fruit {
 protected void showMessage(String color){
  System.out.println("The color of the fruit is: " + color);
 }
}

Apple.class is in the test package and inherits the Fruit.class (using the keyword extends). Here the object of the Apple.class uses the method showMessage() from the Fruit.class.

package test;
 
import com.mypackage.Fruit;
 
public class Apple extends Fruit {
 
 private String color = "Red";
 
 public static void main(String args []){
  Apple apple = new Apple();
  apple.showMessage(apple.color);
 }
}

The last is a Private access modifier. This is the most restrictive modifier acces. Private means that methods and variables can only be accessed by the same class. An instance variable with a private access modifier can only be used by methods in the same class, but cannot be seen or used by other classes or objects.

Private methods can be called by other methods in the same class but cannot be called by other classes. In addition, either the method or the private variable cannot be inherited or inherited from the subclass.

Consider the example below, where the Fruit.class and the FruitTest.class are in the same package which is com.mypackage. The showMessage() method has a default access modifier. When this method is to be accessed by the FruitTest.class (different class), an error will occur stating that the method is "not visible".

package com.mypackage;
 
public class Fruit {
 
 String name = "Grape";
 
 private void showMessage(){
  System.out.println("The name of the fruit is: " + name );
 }
 
}


package com.mypackage;
 
public class FruitTest {
 
 public static void main(String args []){
  
  Fruit fruit = new Fruit();
  
  //instance variable name from the Fruit class has default modifier
  //so that it can be accessed in the same package by different classes
  System.out.print(fruit.name);
  
  //The method showMessage not visible because private modifier
  fruit.showMessage();//Error occured
  
 }
 
}

Private can be used in class constructors. However, if it is implemented, you can not create an object outside the class.

That's all about the difference between public, private, and protected modifiers in Java. Rule of thumb is to keep things as much private as possible because that allows you the flexibility to change them later. If you cannot make them private then at-least keep them package-private, which is also the default access level for class, methods, and variables in Java. You should also keep in mind that access modifiers can only be applied to members e.g. variables and methods which are part of the class, you can not make a local variable public, private, or protected in Java.

Sunday, May 17, 2020

Branching Statements in Java With Example

java_branching_statements
Branching is simply a term used to refer to a branched program flow.

Branching is also known as "Control Flow", "Condition Structure", "IF Structure", "Decision", etc. Everything is the same.

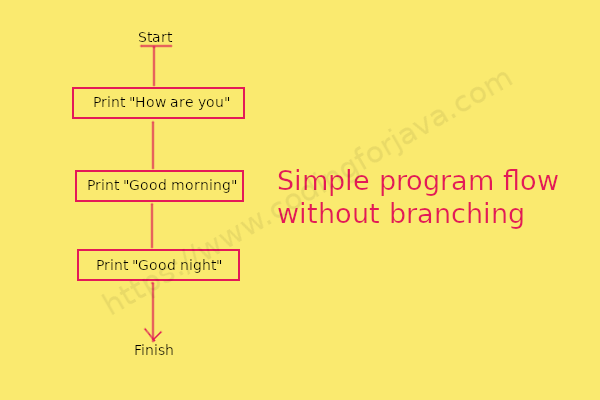
Generally, the flow of code program execution is done one by one from top to bottom.

Line by line read, then the computer does as instructed.

simple_program_flow_without_branching

In the diagram above, the flow is indeed one.

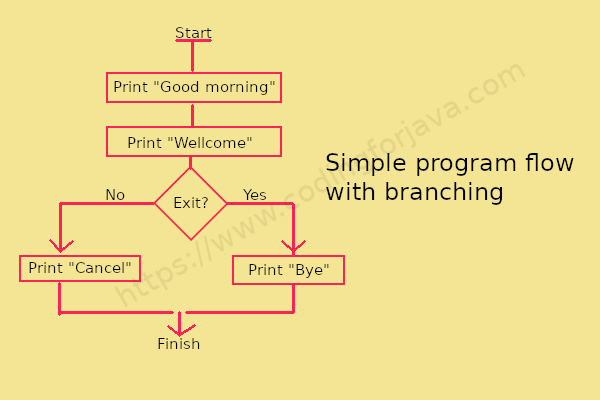
But after we use the branching, the flow will increase like this.

simple_program_flow_with_branching


Then how to write branching statements in Java?


Branching statements in java language is divided into:
  • if (simple)
  • if-else
  • if-else-if
  • switch case


If Statement


This branching has only one choice. Means, IF option will only be executed if true. Examples of IF structure formats like this:

if (kondisi){
    statement1;
    statement2;
}

Statement1 and statement2 will be executed when the condition is true. Meanwhile, when the condition is false, both statements are not executed by the program.

As an example, let's create a simple java program.
Suppose there is a bookstore. They give gifts of school supplies to buyers who are spending over USD 100.

Then we can make a program like this:

import java.util.Scanner;

public class DoorPrize {

    public static void main(String[] args) {

        // make shopping variables and scanner
        int shopping = 0;
        Scanner scan = new Scanner(System.in);

        // take user input
        System.out.print("Total Expenditures: $ ");
        shopping = scan.nextInt();

        // check whether the buyer shopping above 100
        if ( shopping > 100 ) {
            System.out.println("Congratulations, you get a prize!!");
        }

        System.out.println("Thank you...");

    }

}

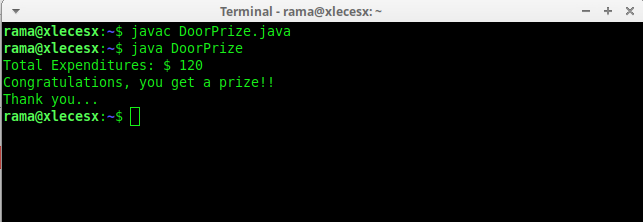
Run the program and watch the results.

example_java_program_using_if_statement

Try to give a value under 100 and watch what happens.

IF ELSE statement


In the second IF branch there is an ELSE section where there are conditions that are not met, then a statement on the ELSE section will be executed. Examples of IF structure formats like this:

if (condition){
    statement1;
    statement2;
}else {
    alternative_statement1;
    alternative_statement2;
}

Here, alternative_statement1 and alternative_statement2 inside the ELSE section will be run when the condition is false.

As an example, let's create a simple student grade java program.
For example, if a student's grade is greater than 70, then he is declared graduated. If not, then he fails.

We can make the program like this:

import java.util.Scanner;

public class StudentGrade {

    public static void main(String[] args) {

        // create a variable and Scanner
        int grade;
        String name;
        Scanner scan = new Scanner(System.in);

        // take user input
        System.out.print("Name: ");
        name = scan.nextLine();
        System.out.print("Grade: ");
        grade = scan.nextInt();

        // check whether students graduate or not
        if( grade >= 70 ) {
            System.out.println("Congratulations " + name + ", you have successfully graduated!");
        } else {
            System.out.println("Sorry " + name + ", you failed");
        }

    }

}

Run the program and watch the results.

simple_if_else_java_program

Try to change the input values and see what will happen.

IF ELSE IF statement


if-else-if statement is used when we need to check multiple conditions. In this statement we have only one “if” and one “else”, however we can have multiple “else if”. It is also known as if else if ladder. This is how it looks:

if (condition1) {
     statement1;
     statement2;
} else if (condition2) {
     statement3;
     statement4;
} else if (condition3) {
     statement5;
     statement6;
} else {
     alternative_statement;
}

We can see above, it has 3 conditions. The program will read the condition from top to bottom sequentially, where condition1 will be checked whether it is true? If Yes then statement1 and statement2 will be executed.

If the condition is false, it will be checked for condition2 and so on, until the condition3. If all conditions are false, then the program will execute an alternative statement in the ELSE section.

Note: The most important point to note here is that in if-else-if statement, as soon as the condition is met, the corresponding set of statements get executed, rest gets ignored. If none of the condition is met then the statements inside “else” gets executed.

Example java program using if else if statement:

import java.util.Scanner;

public class StudentGrade {

    public static void main(String args[]) {
        Scanner sc = new Scanner(System.in);
        int grade;
        System.out.print("Enter Value : ");
        grade = sc.nextInt();
        
        if (grade>=90){
            System.out.println("Very good"); 
        }else if (grade>=80){
             System.out.println("Good"); 
        }else if (grade>=70){
             System.out.println("Average"); 
        }else if (grade>=60){
             System.out.println("Minus"); 
        }else {
            System.out.println("Worse"); 
        }    
    }

}

The above program makes a branching with several statements to be executed only if the conditions are met. There, I create a grade variable for the user input.

The condition checked first is the condition at the top. If the value entered is more than 90? then the output is "very good". If the condition is not met, the program will continue to the next statement where the condition is true.

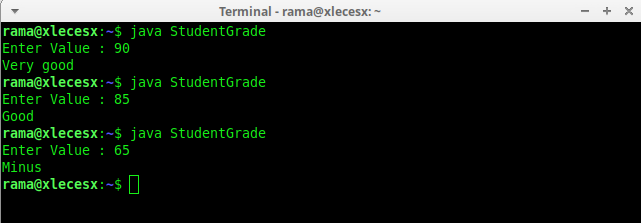
Below is the program output with various grade input.

simple_if_else_if_java_program

SWITCH CASE statement 


A switch statement allows a variable to be tested for equality against a list of values. Each value is called a case, and the variable being switched on is checked for each case. The syntax structure is below:

switch (expression){
     case value:
           statement1;
         break;
     case value:
           statement2;
         break;
     case value:
           statement3;
         break;
     default :
         default_statement;
}

Example java program using SWITCH CASE statement:

import java.util.Scanner;

public class Faculty {

    public static void main(String args[]) {
        Scanner sc = new Scanner(System.in);
        int facultyCode;
        System.out.print("Enter Faculty Code : ");
        facultyCode = sc.nextInt();
        switch(facultyCode) {
          case 1: 
                 System.out.println("Information Management");
                 break;
          case 2: 
                 System.out.println("Computer Engineering");
                 break;
          case 3: 
                 System.out.println("Accounting");
                 break;
          case 4: 
                 System.out.println("International Law");
                 break;
    case 5: 
                 System.out.println("Philosophy");
                 break;
          default: 
                 System.out.println("Sorry, unavailable!!!!!!");
        }
    }
}

The program output with various input entered:

simple_switch_case_program

We have already learned several types of branching in java.

The summary is below:
  • IF, only have one choice;
  • IF / ELSE has two choices;
  • IF / ELSE / IF has more than two choices;
  • SWITCH / CASE is another form of IF / ELSE / IF;
  • Nested branching is a branching in a branching;
  • The use of logical operators in branching can make branching shorter.

Saturday, May 16, 2020

How to Declare Java Language Variables


how_to_declare_java_variable

Variables are identities used to hold a value. Technically, the variable refers to an address in the computer's memory. When we create a variable, a memory slot will be prepared to hold that value. Each variable has a name as the identity of that variable.

The contents of variables can change throughout the program code. For example, if I make the program calculate the area of a triangle, then I will prepare a variable length and width with the contents of numbers 10 and 12. Then, later the contents of the variable length and width can be changed by the numbers 20, 50, or other values.

Variables can also be used to hold input values, for example, we want the length and width to be filled by the user. Regarding how to input data into the Java program code, we will discuss it in a separate tutorial.

Before I continue, for those who are new to learning java, you should first read:

How To Install Java JDK and JRE

How To Add Java Jdk To Path Tutorial

How To Run Java Program Code (Compile Process)

Rules for Naming Variables in Java


The variable naming rules refer to the identifier requirements that we discussed in the previous tutorial Understanding The Basics Structure And Java Syntax.

However, let me tell you again the rules for naming variables in the Java programming language:
  • Variables can consist of letters, numbers and underscore characters (_).
  • The first character of a variable can only be letters and underscore (_), cannot be numbers.
  • Variables must be other than keywords. For example, we cannot use the word int as a variable name, because int is a keyword for integer data types.
  • Variable names should be written using the camelCase writing style, where each word also starts with an uppercase letter, except the first word and no spaces. For example: car, carName, or sumDiscount.
When writing variables, there are 2 steps in almost all programming languages: declaration and initialization.

Declaration is the process of telling a Java compiler that we will create a variable. Here, java is a programming language with the concept of strongly typed programming language, which means that for each variable, the data type must be declared. Is it integer, float number, char, or something else.

The most commonly types of variables in java with examples
Data Type Size Description
byte 1 byte Stores whole numbers from -128 to 127
short 2 bytes Stores whole numbers from -32,768 to 32,767
int 4 bytes Stores whole numbers from -2,147,483,648 to 2,147,483,647
long 8 bytes Stores whole numbers from -9,223,372,036,854,775,808 to 9,223,372,036,854,775,807
float 4 bytes Stores fractional numbers. Sufficient for storing 6 to 7 decimal digits
double 8 bytes Stores fractional numbers. Sufficient for storing 15 decimal digits
boolean 1 bit Stores true or false values
char 2 bytes Stores a single character/letter or ASCII values

For example, in the following program code I declare 4 variables:

class HelloWorld {
  public static void main(String args[]){
    int result;
    double area;
    char alphabet;
    String activity;
  }
}

Here, int result will create a variable with int data type. This means that the result variable can only be filled with an integer. Area is a double type, so it can hold fractional numbers. Alphabet is type char, so it can hold 1 character. And activity has a String data type to be filled in with 1 sentence.

After a variable is declared, we can input or give the initial value into the variable. This initial assignment process is known as initialization.

The value provided must match the data type. Following is an example of the declaration and initialization process from the previous code:

class HelloWorld {
  public static void main(String args[]){
    int result;
    double area;
    char alphabet;
    String activity;
     
    result = 10;
    area = 2.89;
    alphabet = 'B';
    activity = "Learn Java Language";
  }
}

Now, each variable already contains a value. The equal sign (=) is an assignment operator to fill in a value. The assignment process is carried out from right to left. Result = 10 means that we assign the number 10 to the result variable.

To display the contents of a variable, we can use the System.out.println() command:

class HelloWorld {
  public static void main(String args[]){
    int result;
    double area;
    char alphabet;
    String activity;
     
    result = 10;
    area = 2.89;
    alphabet = 'B';
    activity = "Learn Java Language";
     
    System.out.println(result);
    System.out.println(area);
    System.out.println(alphabet);
    System.out.println(activity);
  }
}

java_variable_example

Variable declaration and initialization process can also be done at once in one line statement:

class HelloWorld {
  public static void main(String args[]){
 
    int result = 10;
    double area = 2.89;
    char alphabet = 'B';
    String activity = "Learn Java Language";
     
    System.out.println(result);
    System.out.println(area);
    System.out.println(alphabet);
    System.out.println(activity);
  }
}

We can also declare several variables in one command line, as long as those variables have the same data type. Here is an example:

class HelloWorld {
  public static void main(String args[]){
    int a, b, c;
     
    a = 22;
    b = 9;
    c = 86;
     
    System.out.println(a);
    System.out.println(b);
    System.out.println(c);
  }
}

Once a variable is declared and given initial values, we also can change its value throughout the program code runs:

class HelloWorld {
  public static void main(String args[]){
    
    int a, b, c;
     
    a = 5;
    b = a;
    a = a + b;
    c = b + b + a;
     
    System.out.println(a);
    System.out.println(b);
    System.out.println(c);
  }
}

If we try to run the piece of java code above, then the result:

java_variable_example_code

In this tutorial, we have learned the meaning of variables and ways of writing a variable in the Java programming language.

Friday, May 15, 2020

Understanding The Basics Structure And Java Syntax


basic_structure_and_java_syntax

Each programming language has a different syntax writing structure and rules. Java is a programming language developed from C language and of course it will follow the writing style of C.

When you first see a Java program, you might be wondering. What the f**k is that?

Example:

class Program {
    public static void main(String args[]){
        System.out.println("Hello World");
    }
}

Many things we do not know yet.
What the package is about?

What the class is about?

And why should it be written like that?

Therefore, we need to learn the basic syntax and structure of Java programs.

Let's get started…

Basic Structure of The Java Program


Java program structure is generally divided into 4 parts:
  • Package Declaration
  • Import Library
  • Class section
  • Main method
Let's look at an example:

// package declaration
package com.codingforjava.program;

// Import library
import java.io.File;

// Class section
class Program {
    
    // Method Main
    public static void main(String args[]){
        System.out.println("Hello World");
    }

}

Let's discuss them one by one…

1. Package Declaration
Package is a folder that contains a collection of Java programs. Package declarations are usually used when creating large programs or applications.

Example package declaration:

package com.codingforjava.program;

Normally, the package name follows the domain name of a vendor who made the program.

In the example above, I use com.codingforjava where it is the domain name of Coding For Java. The rule is that domain name is reversed, then the program name is followed.

What if we don't declare the package?

It's okay and the program will still work. But, later during production, for example when creating an Android application, we must declare the package.

2. Import Section
In this section, we import the libraries needed for the program. Library is a collection of classes and functions used in creating programs.

Example of importing a library:

import java.util.Scanner;

In the example above, we import the Scanner class from the java.util package.

3. Class section
Java is a programming language that uses the OOP (Object Oriented Programming) paradigm. Each program must be wrapped in a class so that later it can be made into an object.

If you don't understand what OOP is?

Simply understand the class as a program name declaration.

class MyProgram {
    public static void main(String args[]){
        System.out.println("Hello World");
    }
}

The above is an example of a class block.

The class block is opened with curly braces {then closed or ended with}. Inside the class block, we can fill it with methods or functions as well as variables.

In the example above, there is the main() method.

4. Main method
The main () method or the main () function are the blocks of the program to be executed first.

This is the entry point of the program.

We must make the main() method. Otherwise, the program will not be executed.

Example of the main() method.

public static void main(String args[]){
    System.out.println("Hello World");
}

The writing should be like this ...

The main() method has the args[] parameter. This parameter will store a value from the argument in the command line.

Then, inside the main () method, we have a statement or function:

System.out.println("Hello World");

The code above is a function to display text to the screen.

Statements and Expressions in Java


Statements and expressions are the smallest parts of the program. Every statement and expression in Java must end with a semicolon (;).

Examples of statements and expressions:

System.out.println("Hello World");
System.out.println("How are you?");
var x = 3;
var y = 8;
var z = x + y;

Statements and expressions are instructions that will be run by the computer.

In the example above, we tell the computer to display the text "Hello World", and "How are you?".

Then we tell him to calculate the value of x + y.

Java Program Blocks


A program block is a collection of statements and expressions wrapped together. Program blocks are always opened with curly braces {and closed with}.

Example block program:

// main program block
public static void main(String args[]){
    System.out.println("Hello World");
    System.out.println("Hello Code");

    // if block
    if( true ){
        System.out.println("True");
    }

    // for block
    for ( int i = 0; i<10; i++){
        System.out.println("Recurrence to"+i);
    }
}

The point is, if you find the {and} brackets, then it is a program block. Program blocks can also contain other program blocks (nested).

In the example above, the main() program block contains the if and for blocks.

We will learn more about blocks in:

Branching on Java.
Iteration in Java.

Comments on Java


Comments are a part of the program which is not executed by the computer.

The comment function is:
  • Give information on the program code.
  • Disabling certain functions.
  • Make documentation, etc.
Writing comments on java is the same as in C language using:

Double slashes (//) for single-line comments;
Star slash (/*...*/) for long comments.

Example:

public static void main(String args[]){
    // this is a one-line comment
    System.out.println("Hello World");
    
    // comments will be ignored by the computer
    // The following functions are deactivated by comments
    // System.out.println("Hello World");

    /*
     Comment
     with more than
     one line
    */
}

Strings and Characters


A string is a collection of characters. We often know it as a text.

Example string: "Hello world"

Strings in Java must be enclosed in double quotes as in the example above. If it is enclosed in single quotes, it will become a character.

Example: 'Hello world'.

So please make it a concern:

Double quotes ("...") to make a string;
While single quotation marks ('...') to make a character.

Case Sensitive


Java is Case Sensitive, meaning uppercase or capital letters and lowercase letters are distinguished.

Example:

String name = "My Name";
String Name = "myname";
String NAME = "yourname";

System.out.println(name);
System.out.println(Name);
System.out.println(NAME);

The three variables above are three different variables, although they all use names as their variable names.

Many beginners are often wrong on this matter. Because they cannot distinguish which variables use uppercase letters and which use lowercase letters.

If we make a variable like this:

String myCar = "Mercedes-Benz";

Then we have to call like this:

System.out.println(myCar);

Not like this:

System.out.println(mycar);

Note, the letter C is capitalized.

Case Writing Style


The case styles used by Java are camelCase, PascalCase, and ALL UPPER.

The camelCase writing style is used for variable names, object names, and method names.

Example:

String myName = "Howard";

Then for PascalCase, it is used for writing class names.

Example:

class HelloWorld {
    //...
}

Note the name of the class, we use capital letters in the beginning, and capital letters in the letter W to separate the two prefix.

As for camelCase, the front letters use lowercase letters, and the next prefix uses uppercase letters.

// this is camelCase
learnJava

// this is PascalCase
LearnJava

Then, writing ALL UPPER or all capital is used to create a constant name.

Example:

public final String DB_NAME = "javacoder";

For writing two or more syllables, ALL UPPER is separated by the bottom line or underscore (_).

Is it okay I write about anything?

For example for the class name using ALL UPPER?

It's okay, the program won't get an error. But the program code will look dirty and out of the guide line that has been set.

Those are some rules of writing Java syntax and basic program structure that should be known. Happy coding ...

Thursday, May 14, 2020

Learn To Understand Java Program Code Error Messages

learn_understand_java_error_code

In the previous tutorial about how to run java program code, we have successfully written, compiled and run java program code. Now, I'm going to play around with the code to see what happens if the code doesn't compile successfully.

Display Text Messages with Java


Previously, we have successfully displayed the text "Hello World". Now I want to change the contents of the file to "Pssstt ... I want to learn Java":

Here is the program code:

class HelloLearn {
  public static void main(String args[]){
    System.out.println("Pssstt ... I want to learn Java");
  }
}

Save as HelloLearn.java. Notice, aside from the text in line 3, I also change the class name in line 1 to HelloLearn.

Just like before, we have to compile this program code using javac.exe:

javac HelloLearn.java

There is a slight change here. Besides the file name, I only write "javac", no longer "javac.exe". This is because in Windows cmd, the .exe application can be called without the word ".exe". Next, do the same thing as before for the process of running Java byte code:

java HelloLearn

As a result, the text "Pssstt ... I want to learn Java".

Run_HelloLearn_Java

Just a reminder, the javac and java commands here are used to call the javac.exe and java.exe files located in the C:\Program Files\Java\JDK_VERSION\bin\ folder. However, because we have previously add java Jdk to the Windows PATH, then now, both can be called from any folder.

Check Error Messages in Java


If the program code has an error, an error message will appear during the compile process. Let's try it.

Create a new file ShowError.java with the following code:

class ShowError {
  public static void main(String args[]){
    System.out.println("There was a little error...")
  }
}

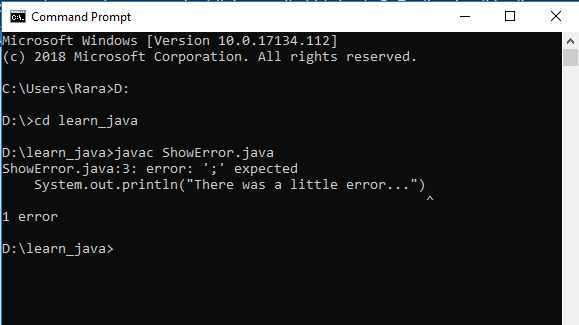
Now, what has changed is the name of the class in line 1 and the contents of the text in line 3. Notice I accidentally deleted the semicolon at the end of line 3. The following results when compiling with javac:

javac_compile_error

Display when an error occurs. The point is, focus on the error message that appears, i.e. error: ";" expected. Here, javac.exe complains because in line 3 there should be a semicolon ";" The caret or cap "^" also indicates the position of the error detected.

If the compilation process generates an error, no java .class file will be created until the problem is resolved.

Okay, please add a semicolon at the end of line 3, then delete the quotation marks instead of the end of the text:

class ShowError {
  public static void main(String args[]){
    System.out.println("There was a little error...);
  }
}

Save the ShowError.java file and recompile it:

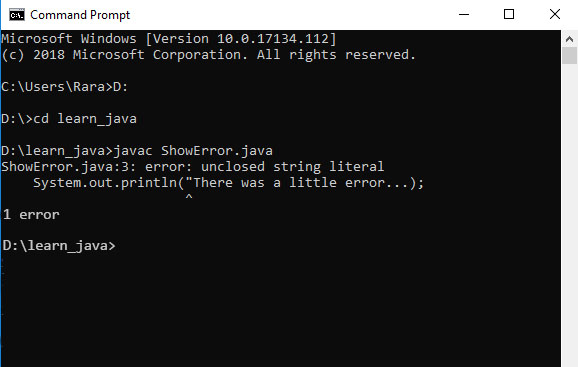
unclosed_string_literal_error

This time, the error message is an unclosed string literal. Here, javac.exe complains because there is no closed string. The cap character "^" refers to the first quotation marks, quotation marks that are not found in closing pairs. Now, try fixing it again.

Those are some of the error messages that will often be encountered during coding in Java. Java error code is a very understandable thing. Even the most expert programmers often encounter errors. As long as you can understand the error in question, it doesn't matter.

If you feel deadlocked, please copy and paste the error message to Google. Most likely there are other programmers who face similar problems and explain the solution.

Further explanation about the rules of writing Java code, I will discuss in a separate tutorial. For now, we just focus on learn to understand java error message only.

Error messages are everyday friends for the programmer, especially if we have handled complex program code and consists of tens or hundreds of lines of program code. Therefore, learn to understand the error code and find the cause.

How To Run Java Program Code (Compile Process)


how_to_run_java_program

There are 2 choices for writing Java program code, using a text editor or using an IDE (Integrated Development Environment).

Text editor is an application specifically designed for writing text. A text editor is mostly lightweight and offers standard features such as line numbering and syntax highlighting. Generally, text editors can be used to write various programming languages.

Text editor of choice is quite varied, among which is quite popular is Notepad ++, Sublime Text, Atom, and VS Code. Windows Notepad is a text editor, but it is not suitable to make a program because it is too simple, for example it does not have line numbering.

Read also: How To Compile And Run Java Programs Using Visual Studio Code

Another option for creating a Java program code is to use an IDE (Integrated Development Environment). An IDE can be said to be a heavyweight text editor because it offers many features. So the IDE file size is much larger than an ordinary text editor.

The majority of IDEs are specifically designed for certain programming languages, although some provide features for other programming languages. Popular IDE choices for the Java language are Eclipse, NetBeans, and IntelliJ IDEA. One of the features of the IDE is writing, running, and inspecting Java program code errors in one place.

Java IDEs such as Eclipse or NetBeans is useful for advanced material. So for today's Java learning tutorial, I decided to use the traditional method first, using a text editor. The goal is that we can see how to compile and run Java code manually and find out what is being run.

How To Write Java Program Code


To be more organized, I will create a special folder called
learning_java on drive D. All tutorial files will be placed within this folder. But, this is not mandatory, you can place Java files anywhere.

Next, run any text editor and create a new file. Then, please type the following program code or just copy and paste:

class Hello {
  public static void main(String args[]){
    System.out.println("Hello World");
  }
}

For the time being, we will not discuss the contents of the program code above. The main goal now is only to see how to run the Java program code. But, the point of the program code above is that I want to display the text "Hello World".

After writing the above program code, save it into the D:\learn_java folder with the file name Hello.java.
save_file_hello.java

How To Compile Java Program Code (javac.exe)


Navigate to the D:\learn_java folder by typing the following command:

D:

cd learn_java

Once inside the learn_java folder, type the following command:

javac.exe Hello.java

Here, we run the javac.exe file with the Hello.java as the input file. That is, the Hello.java file will be read and processed by the javac.exe application. If no problems are found, the javac.exe application will create a Java byte code with the name Hello.class.

Please open Windows Explorer and enter the D:\learn_java folder, there will be 2 files: Hello.java and Hello.class.

Hello.java_and_Hello.class

Up to this point, we have successfully compiled the Java program code using javac.exe.

Running Java Byte Code (java.exe)


To show the output results, we must run the Hello.class file using the java.exe application.

So, let's open the Windows cmd and navigate to the learn_java folder. Now type the following command:

java.exe Hello

This command instructs the java.exe file to look for the Hello.class Java byte code file in the current folder and run it. Note that we only need to write "Hello", even though the file name is "Hello.class".

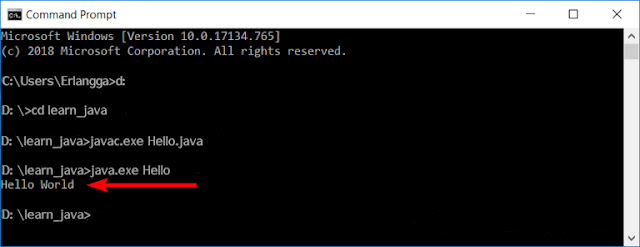
As a result, the text "Hello World" will appear as shown below:

run_java_byte_code

Congratulations! You have successfully written, compiled, and run a Java program code.

To summarize, here is the process we have made:
  • Write the Java program code using a text editor, then save as Hello.java.
  • Run the javac.exe application to compile the Hello.java program code into a Java byte code with the name Hello.class.
  • Run the java.exe application to run the Java byte code Hello.class. The result is the text "Hello World" will appear in Windows cmd.
In this tutorial, we have discussed how to run the Java program code. But when making program code, there are times when there are typos in the command. What if the error occurs? We will discuss in the advanced Java tutorial on this blog: Learn Java Program Code Error Messages.

Wednesday, May 13, 2020

10 Best IDE for Java Development

Best_IDE_For_Java_Develoment

IDE or Integrated Development Environment is a software application that provides comprehensive facilities for computer programmers during the software development process. By default the IDE has:
  • Source code editor.
  • Debugger.
  • Build automation.
IDE can provide convenience and speed for programmers. Sometimes choosing which IDE to use is time-consuming. As an option, you can use notepad or use an IDE with various features such as NetBeans, Eclipse Java IDE, JDeveloper, Intellij, Android Studio, JEdit, or MyEclipse.

Which IDEs Should Be Used?

The real answer is based on programming needs, budget and desires. However, beginners can use the most popular IDEs such as NetBeans, Eclipse and even BlueJ.

Because Java is widely used in various fields such as software development, android, networking, system development, education, games development and so on, therefore each IDE offers different features. Usually, an organization or professional developer will spend enough time evaluating development tools before deciding which to use.

For example, Intellij IDEA and MyEclipse are commercial, feature-rich Java development tools for J2EE enterprise-grade application development. Meanwhile, DrJava, JGrasp and BlueJ only offer minimum features making it suitable for students or beginners. The spread of android applications has also produced a more specific IDE for this purpose, for example Android Studio which offers various features for developing mobile applications quickly.

So, here are 10 of the best Java IDEs that are suitable for modern java development, offering convenience and speed for both free and commercial versions.

Netbeans

Netbeans_IDE

NetBeans was first introduced in 1997 as a student project in the Czech Republic. NetBeans is free, open source, and multiplatform IDE support for Windows, Linux, Mac and Oracle Solaris. It is widely used by professional developers for developing enterprise, web, desktop and mobile applications.

NetBeans IDE features:
  • Analysis.
  • The design.
  • Coding.
  • Profiling.
  • Testing.
  • Debugging.
  • Compiling.
  • Running.
  • Deploy application.
NetBeans supports many programming languages. NetBeans also comes with support for Weblogic and Glassfish, making it a competent platform for J2EE application development. NetBeans fully supports Dependency Injection, contexts, Facelets (JavaServer Faces), RichFaces, ICEfaces, EJB webs, and so on.

NetBeans is very suitable in terms of development with persistence of API, JSP, spring, struts, servlets, web services and Hibernate frameworks. Integrated GUI builder with a drag and drop system using the Swing platform.

Moreover, this IDE can also be used for Java Card development projects, supporting Maven and Ant systems.

You can download NetBeans here.

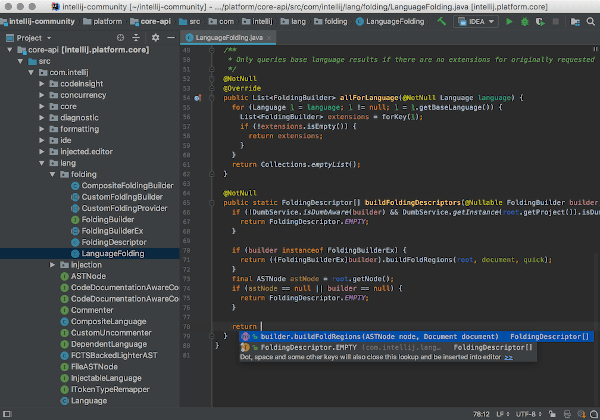
IntelliJ IDEA

IntelliJ_IDEA

IntelliJ IDEA is a full-featured IDE for Java EE developers and general Java development. This IDE comes from JetBrains which has been in the business development tool for the past 15 years with great success.

IntelliJ IDEA is an IDE for professionals and comes in two editions, the free edition (community) and the ultimate edition targeting enterprise users.

The free edition comes with many features for building Android applications as well as JVM applications. Google Android Studio as the official Android development platform is based on the free community edition of IntelliJ IDEA. The Ultimate Edition comes with the most modern set of features for web application development and enterprise Java EE.

The free community edition features support for Java, Kotlin, Groovy, Scala, Android, Gradle, SBT, Git, SVN, Mercurial and CVS. Furthermore, basics functionality such as code completion, intelligent refactorings, deep static analysis, debuggers, test runners are also included in the free community edition.

Whereas the ultimate edition carries additional features such as:
  • Spring Java MVC framework, Spring Security, Spring Boot, Spring Integration.
  • Support for frameworks such as Node.js, Angular, and React.
  • Support for web development languages ​​such as javascript, typescript, CoffeeScript.
  • Java EE support includes JSF, JAX-RS, CDI, JPA.
  • Support Grails, GWT, Griffon, and Vaadin.
  • Version control with Team foundation server, Perforce, Clearcase, and Visual SourceSafe.
  • Deployment is supported by almost all servers including Tomcat, TomEE, Glassfish, JBoss, WildFly, Weblogic, WebSphere, Geronimo, and Virgo.
  • Build tools including Gulp, Grunt, Webpack, and NPM via the plugin.
You can download the IntelliJ IDEA Java IDE community edition (free).

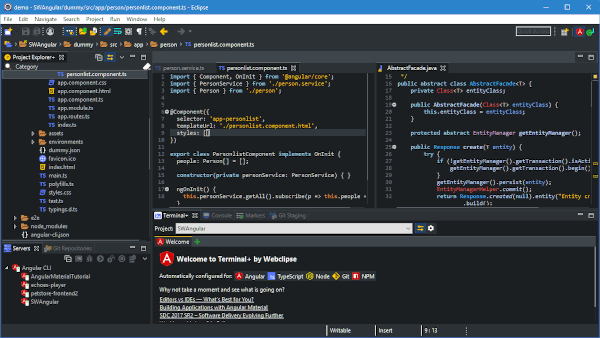
Eclipse

Eclipse_IDE

Eclipse is a big name in the world of Java development. Almost all Java developers have used Eclipse at some point in their careers.

Eclipse has its ecosystem with a large community, complete documentation, and many plugins to make Java development easy. Programmers use Eclipse to develop mobile, desktop, web, enterprise, and embedded system applications.

Eclipse is mostly written using the Java language and available free under the Eclipse public license. You can run Eclipse on Windows, Mac OS X, and Linux.

Eclipse has the advantage when it comes to an integrated development environment. Though, it is best known for Java, Eclipse can be used with many other programming languages. This is the best free Java IDE available out there.

Eclipse is extendable and there are many free and commercial Java IDEs with Eclipse, such as MyEclipse, Orion, and RAD from IBM.

You can download Eclipse here.

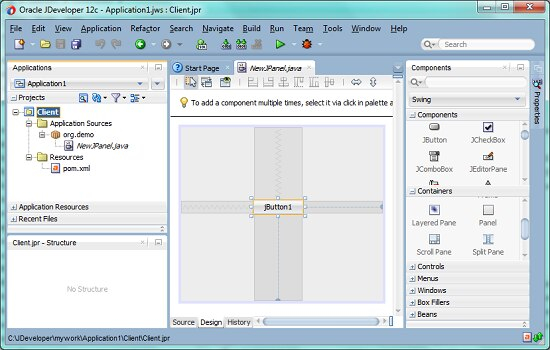
JDeveloper

JDeveloper_IDE

JDeveloper is another open-source Java IDE that comes from Oracle.

This IDE supports full development including modeling, coding, debugging, monitoring, and deployment. JDeveloper is suitable for developing Java EE applications, databases, web services, mobile and integrates well with Oracle Fusion components.

JDeveloper integrates with most version management tools and makes team development easier. JDeveloper also integrates with Oracle cloud services for team collaboration and detailed project development tracking.

This Java IDE equipped with an integrated SQL Developer and PL / SQL query editor and is very helpful in building, browsing and reporting relational databases. JDeveloper is the official development environment for the Oracle Application Development Framework (ADF).
With JDeveloper you also get an embedded WebLogic server making it easy to run, test and debug Java EE applications right in the development environment.

From a web development perspective, JDeveloper has a built-in editor for HTML, CSS, and JavaScript. You also get a visual editor for JSF and also JSP.

SOAP and REST development is assisted by visual WSDL editors, generator schemes and service testing features.

Download JDeveloper Free IDE.

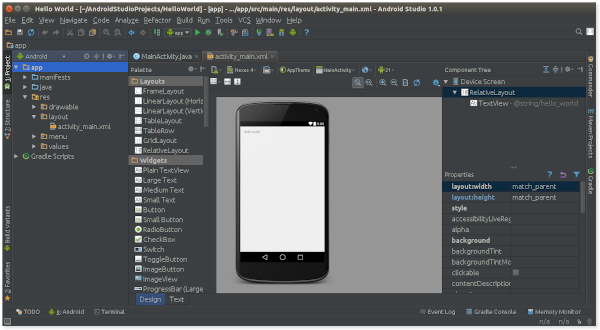
Android Studio

Android_Studio

Android studio is the perfect tool for Android development. It is the official integrated development environment for Android released in 2014 by Google to replace Eclipse Android Development Tools (ADT).

Android Studio is built based on the IntelliJ IDEA community edition available free as an open-source Java IDE under the Apache License.

Currently, Android holds about 71 percent of the mobile app market. Most Android applications are written in Java. This makes Android Studio one of the most widely used IDEs to develop Android applications.

Android Studio features include:
  • Instant run will have a direct effect on any code changes in the currently running application.
  • Rich emulator feature to simulate applications for android wear, cellphones, tablets, and Android TV devices.
  • Intelligent Code Editor.
  • Gradle
  • Integration with Subversion and GitHub for version control.
  • Reused application code and templates.
  • Support for testing frameworks and tools such as JUnit 4 and Firebase Test Lab.
  • Firebase Messaging and Google Endpoints for cloud integration.
  • Intuitive editor.
  • Set of icons for Google material design.
  • GPU profiler for graphical debugging.
You can find out more and download the Android studio here.

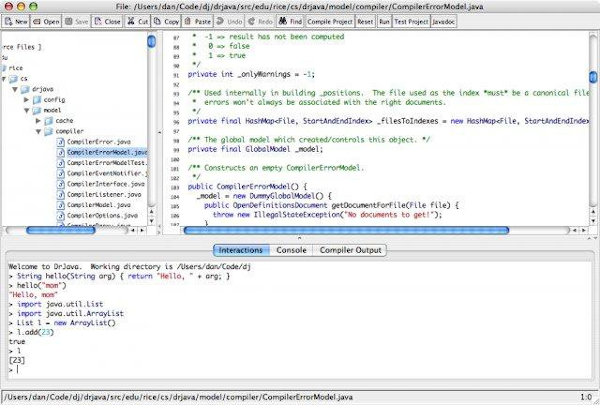
DrJava

DrJava_IDE

DrJava is a lightweight IDE for java developed by the JavaPLT team at Rice University, Houston, Texas. Currently, DrJava is continuously developed by Sun Microsystems, Inc., the Texas Advanced Technology Program, and the National Science Foundation.

DrJava is not intended to compete with heavyweight enterprise IDEs such as Eclipse, NetBeans, IntelliJ, or JDeveloper. This Java IDE is intended for students and novice developers to learn and create school/research projects.

The biggest advantage of DrJava is quick to set up and start writing Java code in a short amount of time because of the availability files to download such as Jar files, Windows App, and also Mac OSX App. So it is very popular among students all over the world.

Is DrJava the best IDE for learning Java?

Well, it all depends on the needs of each person. Here, DrJava has a strong use in education.

Read more about DrJava here.

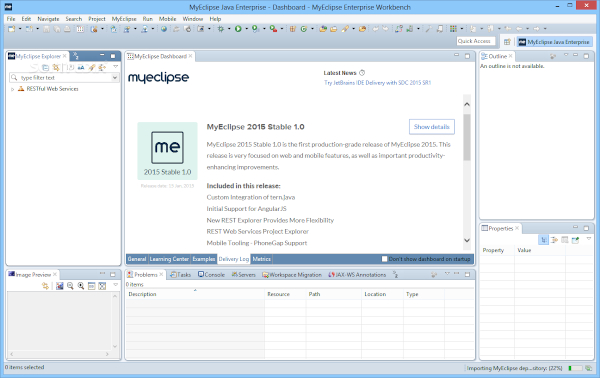
MyEclipse

MyEclipse_IDE

MyEclipse is another best commercial Java IDE built through the open-source Eclipse IDE by a company called Genuitec based in Texas, United States.

MyEclipse is used by many companies and its truly a Java EE Enterprise development platform that produces the best combination of Java EE and new technology.

The main features of MyEclipse include:
  • Support for a variety of frameworks including Springs, Hibernate, jQuery, Cordova, JPA and JSF
  • Access to Eclipse plugins including plugins such as ClearCase, find bugs, tooling graders, subversive, etc.
  • Maven project structure and Built-in launch commands
  • Embedded Derby and Tomcat database connectors for all major databases including WebSphere, Glassfish and WebLogic
  • Tools include Visual ER, JPA, Hibernate and POJO models
  • Spring Scaffolding, Visual Spring Editor and wizards
  • IDE for building applications for WebSphere and Liberty profile servers
  • JSjet is already included for Enterprise web development
  • Tools for generating and performing Rest tests based on web services
  • Live preview for HTML, CSS, and JSP
  • Gerrit workflow integration for team collaboration
MyEclipse comes in Standard and Professional Editions. The standard edition includes features such as database tools, support for Spring, JSF, persistence tools, visual web designers, etc.

Some features included in the Professional Edition are Android & iOS support, mobile web simulators, Image Editor, UML modeling, Rest inspect, Reporting, and JQuery Mobile Templates.

Find out more about MyEclipse here.

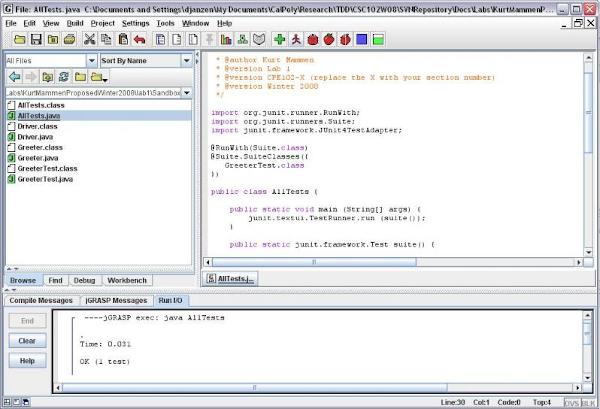
jGrasp

jGrasp_IDE

jGrasp is a free IDE for Java. This IDE is best suited for auto-generation visualization of code as a Control Structure Diagram. jGrasp is quite lightweight IDE written in the Java language runnning on all operating systems with JVM (Java Virtual Machine).

jGrasp is the creation of people at Auburn University. The development is supported by a grant from the National Science Foundation.

jGrasp is quite popular among students, campus communities, and universities. At present, jGrasp is used by more than 380 institutions for teaching and training purposes.

You can read more about jGrasp here.

JEdit

JEdit_IDE

JEdit is a Java editor and open source IDE offers almost all the features required for efficient programming. JEdit is an Editor that can be transformed into a feature-rich IDE with additional use of plugins.

Some plugins needed to convert JEdit to Java IDE include AntFarm, Java Style, JBrowse, JCompiler, JIndex, JunitPlugin, ProjectViewer, and Swat.

JEdit was originally created by Slava Pestov in 1998 and is available for free download with a license from the GPL. JEdit is written purely using the Java programming language and can be run on any platform including Unix, VMS, Mac OSX, OS/2, and Windows.

Read more about JEdit here.

BlueJ

BlueJ_IDE

BlueJ is another lightweight Java Editor for beginners used by millions of students and novice programmers around the world to learn object-oriented programming, and Java in general. BlueJ can be used for small scale projects where you don't need to manage a lot of resources or collaborate between teams. The user interface is easy to use and intuitive allows beginners to start quickly without feeling burdened.

One of BlueJ's main features is the Shell/REPL graphic for Java, where you can interact with objects, check object values, pass objects as parameters, call Java methods, and expressions quickly without compilation.

BlueJ was developed at the University of Kent and supported by Oracle. Historically this IDE was developed and released by Michael Kölling in 1999.

The BlueJ distribution is available with a GNU license and can be installed on Ubuntu/Debian, Mac OSX, Windows, and Raspbian Linux. The Jar JDK BlueJ installer jar file is available for other operating systems.

You can find out more about BlueJ here.