Friday, September 4, 2020

Types Of Operators In Java


types_operators_java


Operators in java programming are used to perform certain operations. Suppose we want to add the values of the variables x and y, then we can use the addition operator (+).

x + y

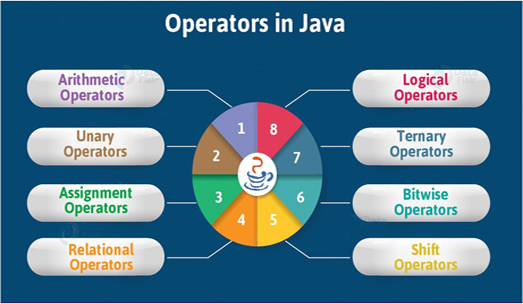
There are six types of operator in Java programming:
  • Artimatic Operators
  • Assignment Operators
  • Comparison Operators
  • Logical Operators
  • Bitwise Operators
  • and Ternary Operators
1. Arithmetic Operators

Arithmetic operators are operators that we usually find for mathematical operations. Arithmetic itself is a branch of mathematics which discusses simple calculations such as times, divide, add and less.

Apart from these four operations, the Java language also has the modulo division operation, or operator % which is used to find the remainder of the quotient.

The following table summarizes the arithmetic operators in the Java programming language:

NAME SYMBOL
Addition +
Substraction -
Multiplication *
Division /
Modulus %


How to use it?

Create a new class named Arithmetic Operators, then type following code:

import java.util.Scanner;

public class ArithmeticOperators {

    public static void main(String[] args) {
        int num1;
        int num2;
        int result;

        Scanner keyboard = new Scanner(System.in);

        System.out.print("Input number 1: ");
        num1 = keyboard.nextInt();
        System.out.print("Input number 2: ");
        num2 = keyboard.nextInt();

        // addition
        result = num1 + num2;
        System.out.println("Result = " + result);

        System.out.print("Input number 1: ");
        num1 = keyboard.nextInt();
        System.out.print("Input number 2: ");
        num2 = keyboard.nextInt();

        // subtraction
        result = num1 - num2;
        System.out.println("Result = " + result);

        System.out.print("Input number 1: ");
        num1 = keyboard.nextInt();
        System.out.print("Input number 2: ");
        num2 = keyboard.nextInt();

        // multiplication
        result = num1 * num2;
        System.out.println("Result = " + result);


        System.out.print("Input number 1: ");
        num1 = keyboard.nextInt();
        System.out.print("Input number 2: ");
        num2 = keyboard.nextInt();

        // Division
        result = num1 / num2;
        System.out.println("Result = " + result);

        System.out.print("Input number 1: ");
        num1 = keyboard.nextInt();
        System.out.print("Input number 1: ");
        num2 = keyboard.nextInt();

        // Remainder
        result = num1 % num2;
        System.out.println("Result = " + result);

    }

}

Program result:

Input number 1: 3
Input number 2: 4
Result = 7
Input number 1: 6
Input number 2: 4
Result = 2
Input number 1: 3
Input number 2: 4
Result = 12
Input number 1: 8
Input number 2: 2
Result = 4
Input number 1: 24
Input number 1: 5
Result = 4

2.Assignment Operator  

Assignment operators are operators that are used to assign values to a variable. In Java, the assignment operator uses an equal sign "=". Later there will also be compound assignment operators, such as "+ =", "- =", etc.

Example:

int a = 10;

The variable a is assigned to store the value 10.

The Assignment Operators consist of:

OPERATOR EXAMPLE SAME AS
= x = 5 x = 5
+= x += 3 x = x + 3
-= x -= 3 x = x - 3
*= x *= 3 x = x * 3
/= x /= 3 x = x / 3
%= x %= 3 x = x % 3
&= x &= 3 x = x & 3
|= x |= 3 x = x | 3
^= x ^= 3 x = x ^ 3
>>= x >>= 3 x = x >> 3
<<= x <<= 3 x = x << 3


Now, create a new class named Assignment Operator.

public class AssignmentOperator {

    public static void main(String[] args) {
        int a;
        int b;

        // value assignment
        a = 5;
        b = 10;

        // addition
        b += a;
        // now b = 15
        System.out.println("Addition : " + b);

        // subtraction
        b -= a;
        // now b = 10 (15-5)
        System.out.println("Subtraction : " + b);

        // multiple
        b *= a;
        // now b = 50 (10*5)
        System.out.println("Multiple : " + b);

        // Division
        b /= a;
        // now b=10
        System.out.println("Division : " + b);

        // Remainder
        b %= a;
        // now b=0
        System.out.println("Remainder: " + b);

    }

}

Program result:

Addition : 15
Subtraction : 10
Multiple : 50
Division : 10
Remainder: 0

3. Comparison Operators

The comparison operator is used to compare 2 values, whether the values are equal, smaller, larger, etc.. The result of this comparison operator is a boolean True or False.

The following table summarizes the results of the comparison operators in Java:

Operator Explanation Example Result
== Equal to 5 == 5 true
!= Not equal 5 != 5 false
> Greater than 5 > 6 false
< Less than 5 < 6 true
>= Greater than or equal to 5 >= 3 true
<= Less than or equal to 5 <= 5 true


The following is an example of a comparison operator program code in Java:

public class LearnJava {
  public static void main(String args[]){
       
    int a = 10;
    int b = 5;
    boolean result;
    
    result = a == b;
    System.out.println("a == b? " + result );   
    
    result = a != b;
    System.out.println("a != b ? " + result );   
    
    result = a > b;
    System.out.println("a > b ? " + result );   
    
    result = a < b;
    System.out.println("a < b ? " + result );   
    
    result = a >= b;
    System.out.println("a >= b ? " + result );   
 
    result = a <= b;
    System.out.println("a <= b ? " + result );   
    
  }
}

Program result:

a == b? false
a != b ? true
a > b ? true
a < b ? false
a >= b ? true
a <= b ? false

4. Logical Operators

Logical operators are used to return true or false boolean values of 2 or more conditions. The following table summarizes the results of the logical operators in the Java language:

Operator Name Description Example
&& Logical and Returns true if both statements are true x < 5 && x < 10
|| Logical or Returns true if one of the statements is true x < 5 || x < 4
! Logical not Reverse the result, returns false if the result is true !(x < 5 && x < 10)

public class LearnJava {
  public static void main(String args[]){
       
    boolean a = true;
    boolean b = false;
    boolean result;
    
    result = a && b;
    System.out.println("Result a && b : " + hasil );   
    
    result = a || b;
    System.out.println("Result a || b : " + hasil );   
    
    result = !b;
    System.out.println("Result !b : " + hasil );  
    
  }
}

Program result: 

Result a && b : false
Result a || b : true
Result !b : true

5. Bitwise Operators

Bitwise operators are operators used for bit (binary) operations.

Bitwise operators consist of:

Name Symbol
AND &
OR |
NOT ~
XOR ^
Zero-fill left shift <<
Signed right shift >>
Zero-fill right shift >>>


The concept is almost the same as the Logic operator. The difference is, Bitwise is used for binary.

Let's try it in a program..Create a new class with the name OptBitwise, then copy below code:

public class OptBitwise {

    public static void main(String[] args) {
        int a = 60;    /* 60 = 0011 1100 */
        int b = 13;    /* 13 = 0000 1101 */
        int c = 0;

        c = a & b;       /* 12 = 0000 1100 */
        System.out.println("a & b = " + c);

        c = a | b;       /* 61 = 0011 1101 */
        System.out.println("a | b = " + c);

        c = a ^ b;       /* 49 = 0011 0001 */
        System.out.println("a ^ b = " + c);

        c = ~a;          /*-61 = 1100 0011 */
        System.out.println("~a = " + c);

        c = a << 2;     /* 240 = 1111 0000 */
        System.out.println("a << 2 = " + c);

        c = a >> 2;     /* 215 = 1111 */
        System.out.println("a >> 2  = " + c);

        c = a >>> 2;     /* 215 = 0000 1111 */
        System.out.println("a >>> 2 = " + c);
    }

}

Program result: 

a & b = 12
a | b = 61
a ^ b = 49
~a = -61
a << 2 = 240
a >> 2  = 15
a >>> 2 = 15

6. Ternary Operators

The ternary operator is an operator that consists of 3 operands. In Java, this ternary operator uses a question mark (?)aAnd a colon (:) to separate the answer.

Here is an example of using ternary operators in the Java programming language:

class OptTernary {
  public static void main(String[] args) {

        boolean like = true;
        String answer;

        // using ternary operators
        answer = like ? "yes" : "no";

        // displays answers
        System.out.println(answer);

    }
}

Program result:

yes


We have studied the various types of operators in Java programming.

Yes, operators are very closely related to mathematics. Therefore, programmers are required to be able to do mathematics.

Monday, August 31, 2020

Learn For Loop in Java with example

for_loop_in_java
In the Java programming (as well as C derived languages such as C ++, PHP and JavaScript), there are 3 loop structures, namely the for loop, the while loop and the do while loop.

So, here we will discuss the for loop first.

Understanding Loop Structure For Java Language

Loop is a program code instruction that aims to repeat several lines of commands. In designing a for loop, we need to know at least 3 components:
  • The initial condition of the loop.
  • Condition at the time of looping.
  • The conditions that must be met for the loop to stop.
The basic format for the for loop structure in Java programming is as follows:

for (start; condition; increment) 
{
   // code here
   // code here
}

Start is a condition at the beginning of the loop. Usually this initial condition contains a command to assign a value to the counter variable. The counter variable itself is a variable that determines how many loops are performed. Most programmers use the variable i as a counter variable (this is not necessary, you can also use other variables).

As long as the conditions are met to running the loop , the Java language compiler will continue looping. For example, the condition contains the command i < 7, so as long as the "i" variable contains a number less than 7, then the program will keep looping.

Increment is the part that is used to process the counter variable so that it can fulfill the final loop condition. This section will always be executed on every loop.

It is called an increment because it usually contains increment operations such as i ++, which is actually the same as i = i + 1. That is, in each loop, the variable i will raise by 1 digit. But we can also give other values such as i = i + 2 so that the counter variable will increase by 2 digits per iteration

In addition, there is the term iteration (iteration), which means 1 iteration. This term is used quite often when discussing loop structures.

Example of looping program code for Java language.

As the first example, I want to display the text “Hello World” 5 times. Here's the program code:

class LearnJava {
  public static void main(String args[]){
     
    int i; 
    for (i = 1; i < 5; i++) { 
      System.out.println("Hello World "); 
    }
   
  }
}

In line 4, I create a variable "i" which is set as the integer data type. This variable will later be used as a counter variable, which is a variable that determines the final state of the loop.

The command at line 5, namely for (i = 1; i <5; i ++), can be read:

"Run the loop, starting from variable i = 1 to i < 5. In each iteration, increase the value of the i variable by 1 digit using the i++ command".

Here are the results:

Hello World
Hello World
Hello World
Hello World

The question is, why only 4 lines of “Hello World” appear? Even though we repeat from i = 1 to i < 5.

This has to do with the use of signs. The final condition of the loop is i < 5, which means that it will always be true if i is less than 5, but if it reaches 5 then the condition becomes false and the loop stop.

There are 2 alternatives to make the "Hello World" can come out 5 times. You can change the initial condition to i = 0, or change the final condition to i <= 5. The second option looks better:

class LearnJava {
  public static void main(String args[]){
     
    int i; 
    for (i = 1; i <= 5; i++) { 
      System.out.println("Hello World "); 
    }
  }
}

Program code results:

Hello World
Hello World
Hello World
Hello World
Hello World

Now the "Hello World" has appeared 5 times. Again, be careful using java comparisons, especially between "<" and "<=".

Inside the loop, we can also access the counter variable like this:

class LearnJava {
  public static void main(String args[]){
     
    int i; 
    for (i = 1; i <= 5; i++) { 
      System.out.println("Hello World "+i); 
    }
   
  }
}

Program code results:

Hello World 1
Hello World 2
Hello World 3
Hello World 4
Hello World 5

Now on the side "Hello World" text, there are the number from the variable value i. Because in each iteration the counter variable i will increase by 1 point (increment process), so when it is displayed it will also increase by 1 point for each iteration.

The counter variable i also doesn't have to be incremented, but it can also be decremented to make the loop decrease. Here's an example:

class LearnJava {
  public static void main(String args[]){
     
    int i; 
    for (i = 5; i >= 1; i--) { 
      System.out.println("Hello World "+i); 
    }
   
  }
}

Program code results:

Hello World 5
Hello World 4
Hello World 3
Hello World 2
Hello World 1

Our code is very similar as before, but pay attention to the for command on line 5: for (i = 5; i> = 1; i–). This can be read:

"Run the loop, starting from the variable i = 5 to i> = 1. In each iteration, decrease the value of the variable i by 1 digit using the command i--".

As a result, the value of the counter variable i will decrease by 1 digit in each iteration.

As a final example, can you make a loop to show the multiple of 3 10 times? The final result we want is as follows:

3 6 9 12 15 18 21 24 27 30

There are several ways to produce this sequence. First, change on the side of the command block to be executed where the counter variable i keeps increasing from 1 to 10:

class LearnJava {
  public static void main(String args[]){
     
    int i; 
    for (i = 1; i <= 10; i++) { 
      System.out.print(i*3 + " "); 
    }
   
  }
}

In order to produce a number that increases by a multiple of 3, the technique used is to multiply the value of the counter variable i by the number 3 for each iteration.

The second way is to modify the increment process of the counter variable:

class LearnJava {
  public static void main(String args[]){
     
    int i; 
    for (i = 3; i <= 30; i = i + 3) { 
      System.out.print(i + " "); 
    }
   
  }
}

Note the for loop command on line 5. The for command (i = 3; i <= 30; i = i + 3) can be read:

"Run the loop, starting from the variable i = 3 to i <= 30. In each iteration, increase the value of the variable i by 3 digits using the command i = i + 3".

This technique is rarely used, but it can be done.

In today's tutorial we have discussed the for loop. Later, these loops can be further combined, for example to create nested loops.

But for the next tutorial, we will continue with the second form of loop in Java, namely the WHILE loop.

Friday, June 5, 2020

Casting And Type Conversion in Java

type_conversion_and_casting_java

In the Java programming language, Type Casting is used to determine and change a value from one data type to another data type. For example, if we have variable A with Integer data type, then we can determine the value of variable A to be float data type or vice versa. There are 2 types of Type Casting in Java called Implicit Casting and Explicit Casting.

Both are used to change the value of one data type variable. The difference between the two types is, Implicit is used to change from small data types to large data types, for example, Bytes to Long or Short to Double.

Widening Conversion (Implicit Casting)


Implicit Casting is used to convert values from small data types to large data types, such as the following:
  • From short data types to int, long, float, or double data types
  • From int data types into long, float, or double data types
  • From char data types into int, long, float, or double data types
  • From float data types into double data types
  • From long data types or into float or double data types
  • From byte data type to short, int, long, float, or double data types
Example of an Implicit Casting program in Java:


public class HelloWorld {
    public static void main(String[] args){
        
        short data1 = 457;
        double double_data = data1; //short to double
        
        char data2 = 'W';
        long long_data = data2;//char to long
        
        int  data3 = 456;
        float int_data = data3;// int to float
        
        byte data4 = 127;
        long long_data2 = data4;//byte to long
        
        float data5 = 565.3f;
        double double_data2 = data5;//float to double
        
        System.out.println("Short to Double: "+ double_data);
        System.out.println("Char to Long: "+long_data);
        System.out.println("Int to Float: "+int_data);
        System.out.println("Byte to Long: "+long_data2);
        System.out.println("Float to Double: "+double_data2);
    }
}

Result:

implicit_casting_java

Narrow Conversion (Explicit Casting)


Explicit Casting is the opposite of Implicit Casting, which is to change values from large data types to small data types, such as:
  • From short data types to bytes or char
  • From double data types to bytes, short, char, int, long or float
  • From char data types to bytes or short
  • From long data types to bytes, short, char or int
  • From int data types to bytes, short, or char
  • From float data type to byte, short, char, int or long
  • From byte data type into the char data type

Examples of Explicit Casting programs in Java:


public class HelloWorld {
    public static void main(String[] args){
        
        short data1 = 3;
        char char_data = (char) data1; //short to char
        
        long data2 = 246447;
        byte byte_data = (byte) data2;//long to byte
        
        int  data3 = 34;
        char char_data2 = (char) data3;// int to char
        
        char data4 = 1;
        short short_data2 = (short) data4;//char to short
        
        double data5 = 345.3;
        float float_data2 = (float) data5;//double to float
        
        System.out.println("Short to Char: "+ char_data);
        System.out.println("Long to Byte: "+byte_data);
        System.out.println("Int to Char: "+char_data2);
        System.out.println("Char to Short: "+short_data2);
        System.out.println("Double to Float: "+float_data2);
    }
}

Result:

explicit_casting_java

What is important in the process of casting and conversion in Java is known beforehand about the type of data in java.

Wednesday, June 3, 2020

Understanding Exception Handling In Java Programming With Examples

exception_handling_in_java


If the Java Virtual Machine (JVM) detects that an operation is not possible, a runtime error will appear during the program runs.

For example, if you are accessing an array using the index out of the bonds, then you will get a runtime error ArrayIndexOutOfBoundsException. Or suppose when you enter a value of type double, but your program is designed for integer values, then you will get a runtime error InputMismatchException.

In Java programs, this runtime error will be thrown as exceptions. These exceptions are also objects that represent an error or condition that prevents the execution from running normally. If an exception is not handled, then the program will stop abnormally.

The question is, how do you handle exceptions so that the java program can continue or stop properly?

Exception handling is an important part of writing powerful Java applications.

Therefore, exception handling is a non-functional requirement for any application. Aims to deal with conditions where errors occur properly such as resources that are not available, invalid input, null input, and so forth.

Java provides several features for handling exceptions built-in in the form of keyword try, catch and finally. The Java programming language also allows you to create new exceptions and throw them using keyword throw and throws.

Exception Handling Overview


Exceptions are thrown from a method. The caller of the method can catch and handle the exception.

To understand handing exceptions, see the sample code below:

import java.util.Scanner;

public class Division {
 
 public static void main(String[] args) {
  
  Scanner input = new Scanner (System.in);
  
  // ask the user to enter two integer numbers
  System.out.println("Enter two integers: ");
  int number1 = input.nextInt();
  int number2 = input.nextInt();
  
  System.out.println("Results of " + number1 + " divided " + number2 
    + " is: " + (number1/number2));
  
 }

}

In the java code above, when the user enters the number 0 in the second number, then a runtime error will occur because the integer cannot be divided by the number 0. For example the output example below:

number_exception_java

A simple way to overcome this problem is to use the conditional if, as in the following example:

import java.util.Scanner;

public class DivisionWithIf{
 
public static void main(String[] args) {
  
  Scanner input = new Scanner (System.in);
  
  // ask the user to enter two integer numbers
  System.out.println("Enter two integers: ");
  int number1 = input.nextInt();
  int number2 = input.nextInt();
  
  if(number2 != 0){
  System.out.println("Results of " + number1 + " divided " + number2 
    + " is: " + (number1/number2));
  }else{
   System.out.println("The divisor number cannot be zero!");
  }
 }

}

Example output:

exception_with_if_java

Before going any further in java exception handling, the above code can be rewritten using a method for division like the example below:

import java.util.Scanner;

public class DivisionWithMethod {
 
 // Static method for calculating division results
 public static int calculateDivision(int number1, int number2){
  if(number2 == 0){
                 System.out.println("The divisor number cannot be zero!");
   System.exit(1);
  }
  return (number1/number2);
 }
 
 public static void main(String[] args) {
  Scanner input = new Scanner (System.in);
  
  // ask the user to enter two integer numbers
  System.out.println("Enter two integers: ");
  int number1 = input.nextInt();
  int number2 = input.nextInt();
  
  int result = calculateDivision(number1, number2);
  
  System.out.println("Results of " + number1 + " divided " + number2 
    + " is: " + (number1/number2));
 }

}

In the above code, the method inline (6-12) will return the results of the division of two integers. If the second number is 0 as the divisor, the program will be terminated on line 9.

This is a problem, because you shouldn't have created a method to stop the program.

So, how can a method notify the caller that an exception has occurred? Java allows a method to throw an exception that can be caught and handled by the caller.

So the code above can be rewritten as:

import java.util.Scanner;

public class DivisionWithException {
 
 // Static method for calculating division results
 public static int calculateDivision(int number1, int number2){
  if(number2 == 0){
    
   throw new ArithmeticException("The divisor number cannot be zero!");
  }
  return (number1/number2);
 }
  
 public static void main(String[] args) {
  
  Scanner input = new Scanner(System.in);
  
  // ask the user to enter two integer numbers
  System.out.println("Enter two integers: ");
  int number1 = input.nextInt();
  int number2 = input.nextInt();
  
  try{
   int result = calculateDivision(number1, number2);
   
   System.out.println("Results of " + number1 + " divided " + number2 
    + " is: " + (number1/number2));
  }
  
   catch (ArithmeticException exception){
    System.out.println("Exception: An integer "
      + "cannot be divided by zero!");
  }
  
  System.out.println("Program execution continues ...");
 }

}

In the java code above, if the second number or the divisor is 0, then the method will throw an exception at line 9:

throw new ArithmeticException ("The divisor number cannot be zero!");

The value threw, in this case, is new ArithmeticException ("The divisor number cannot be zero!"); called an exception. Whereas the execution of the throw statement is called throwing an exception.

An exception object is an object created from the Exception class. In this case, the Exception class is java.lang.ArithmeticException.

With a hierarchy:

java.lang.Object 
      java.lang.Throwable 
          java.lang.Exception 
              java.lang.RuntimeException 
                  java.lang.ArithmeticException

ArithmeticException (String s) constructor is called to construct an exception object. Where String s is a message that explains about exceptions.

When an exception is thrown, then the normal execution flow will be interrupted. Like the term "throw an exception" which means to pass an exception from one place to another.

Try And Catch Blocks


The statement to call the method is contained in a try and catch block. The try block on lines 23 - 28 contains the code to run under normal circumstances.

Meanwhile, the exception will be caught by the catch block on lines 30 - 33. So the code contained in the catch block aims to handle the exception.

Then statement on line 35 will be executed after the catch block is executed.

This throw statement can be analogous to method calls. However, it is not a method that is called, but a catch block.

In this case, a catch block is like a method definition with parameters that match the type of value being thrown. Unlike the method, however, after the catch block is executed, the program control does not return to the throw statement, but will continue to execute the next statement after the catch block.

Block Catch Parameter


On line 30:

catch (ArithmeticException exception)

An exception identifier acts the same as a parameter in a method. Thus, this parameter is referred to as a catch block parameter.

The ArithmeticException above, which was written before the exception is to determine what types of exceptions can be caught by the catch block. Once an exception is captured, then you can access the value thrown from this parameter in the body of the catch block.

In summary, a template of the try-throw-catch block will look like below:

try {
  //Code to run;
  //A statement or method that might throw an exception;
  //Other codes to run;
}
catch (type exception) {
  //Code for processing exceptions;
}

An exception might be raised directly by using the throw statement inside the try block. Or you can also use methods that can throw exceptions.

On line 24, the main method calls calculateDivision(). If the calculateDivision() method runs normally, it returns a value to the caller.

Conversely, if the calculateDivision method finds an exception, it throws the exception back to the caller. Then the catch block of the caller will handle the exception.

Advantages of Using Exception Handling in Java


Now you can see the benefits of using exception handling in java. The advantage is that it allows a method to throw an exception at the caller and allows the caller to handle the exception.

Without these capabilities, the method that is called itself must handle exceptions or terminate the program. Often the method called does not know what to do when an error occurs. This is a typical case for library methods. The library method can detect errors but only the caller can identify what to do when an error occurs.

The main benefit of exception handling is that it separates detection of errors from handling errors.

Many library methods throw exceptions. Following is an example of handling InputMismatchException when reading an input.

import java.util.Scanner;

public class TestInputMismatchException {
 
 public static void main(String[] args) {
  Scanner input = new Scanner(System.in);
  boolean continueInput = true;
  
  do{
   try{
    System.out.print("Enter an integer: ");
    int number = input.nextInt();
    
    //Showing results
    System.out.println("The number entered is "+ number);
    continueInput = false;
   }
   
   catch(InputMismatchException ex){
    System.out.println ("Try again. (Invalid input: An integer is required)");
    input.nextLine();
   }
  }while(continueInput);

 }
}

When executing input.nextInt() on line 12, an InputMismatchException occurs if the user enters a number that is not an integer.

For example, the value 2.9 is inputted, then InputMismatchException occurs and program control will be moved to the 19-22 catch line block. The statements in the block will be executed.

The input.nextLine() statement on line 21 will destroy the current input line and then the user can input the new line.

The variable continueInput controls the loop. The initial value is true on line 7 and when a valid value is received, then it converted to false on line 16. When a valid input value is received, there is no need to continue input numbers.

Saturday, May 30, 2020

How To Compile And Run Java Programs Using Visual Studio Code

run_compile_java_program_using_visual_studio_code

In the previous article, I explained how to compile and run Java programs with CMD on Windows 10. Now, this post will provide a fast way to compile and run Java programs with Visual Studio Code.

Before I give further explanation, make sure you have read my previous article here. And please note that Visual Studio Code (referred to as VS Code) which I mean here is different from Visual Studio which can be used to create applications for various purposes of app development. VS Code is a light version of Visual Studio. VS Code is a cross-platform Code Editor created by Microsoft for Windows, Linux, and macOS. VS Code is also one of the Text Editor widely used throughout the programming world.

Download and Install VS Code


Open your browser, then navigate to the following link, http://www.code.visualstudio.com. Next, please download the VS Code according to the operating system you are using. When download is complete, install it like a normal desktop application.

How to Quickly Compile and Run Java Programs with Visual Studio Code


Open the VS Code program then type the java program code below. Then save it with the name HelloWorld.java. In this tutorial, I saved it in the D:\LearningJava directory.

public class HelloWordl {
  public static void main(String[] args) {
    //Displays a String
    System.out.println("Visit https://www.codingforjava.com");
    System.out.println("Thank You!");
  }
}

Using CMD Shortcuts
In the VS Code main view, press the F1 key or the Ctrl + Shift + P combination to open the command palette. Then you type the command and select Open New Command Prompt to open cmd which by default opens in the active directory of your Java file. Or, you can also use the shortcut Ctrl + Shift + C, and cmd will open immediately.

Using the Integrated Terminal
This method is almost the same as the previous method above. You can also use the integrated terminal to do all the commands in cmd, such as cd to change directories, javac for compile and java to run. You just need to press the Ctrl + ` (backtick) button, and the integrated terminal has appeared at the bottom of your VS Code. (note: backtick button is located to the left of the number 1)

vs_code_integrated_terminal


Using Java Debug Extensions
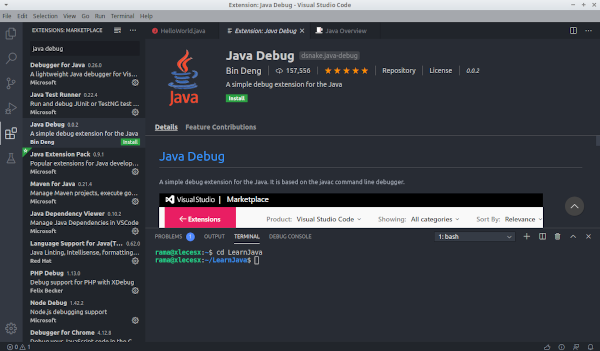
In my opinion, this is a very easy way. But you have to install the additional VS Code extension first. Here's how, press the Ctrl + P, then type ext install java-debug, then enter. Next, in your left sidebar, there will be several options available in the VS Code Marketplace. Select Java Debug published by Bin Deng (see details), then click install. Wait a few moments, click enable and restart your VS Code.

simple_java_debug_vscode_by_bin_deng


To use the extensions is quite easy, here are 3 main commands that will be used:
  • Ctrl + Shift + U = to display the output section.
  • Alt + C = Shortcut for compile (same as javac command)
  • Alt + R = Shortcut for run (same as java command)
Using Code Runner Extensions
This is one of the extensions that can be used for several other programming languages besides Java, such as C, C ++, JavaScript, Python, and so on. This is also one easy way to compile and run Java programs.

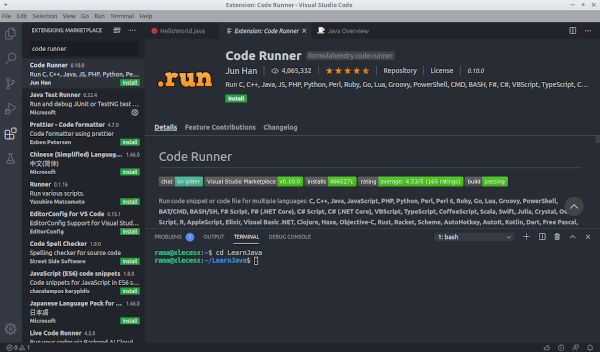
Using this method is very easy. Press Ctrl + P, then type ext install code-runner, then enter. Select Code Runner published by Jun Han (see details), then click Install and activate.

code_runner_vscode

3 ways to use these extensions include:
  • First, open the command palette by pressing F1 or Ctrl + Shift + P. Then type in run code, then enter.
  • Second, use the shortcut Ctrl + Alt + N.
  • And finally, just right-click on your workspace, and select Run Code.
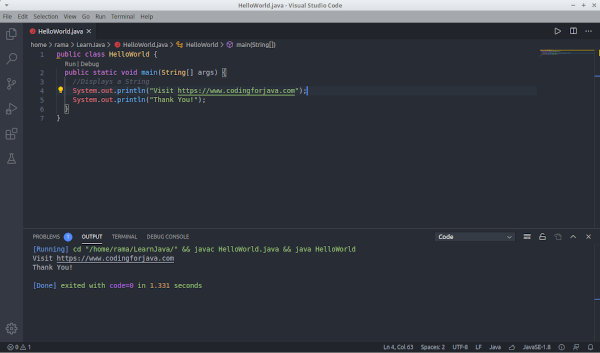
Following is a display of compiled and run Java programs using code-runner extensions.

running_java_code_vscode

So which method do you think is the easiest? Let us know if you also have other easy ways to compile and run Java programs with Visual Studio Code. If you are having difficulties, feel free to ask us through the comments at the end of the article. Hopefully, this article is useful. thanks.

Wednesday, May 27, 2020

Float and Double Data Type Java Language With Example

float_double_java

Float and double data types are fractional number data types. This time we will discuss the difference between float and double in java programming.

Definition of float and double data types in java language


Float and double data types are used to hold fractional numbers such as 3.14, 44.53, or -0.09876. Just like programming languages in general, we use periods as separators of integers and fractions.

The difference between float and double lies in the range of numbers and the level of accuracy. The following table is the difference between float and double data types in Java:

Although float and double data types can store very large numbers, but this data type has general weaknesses as is the case in every programming language (not only Java). That is the level of accuracy. This relates to the mechanism of storage in computers that use binary numbers.

Example of java and float program code examples.

As the first example java code, I will create 2 variables of type float and double, input numbers, then display them:

class HellWorld {
  public static void main(String args[]){
     
    float  var1;
    double var2;
 
    var1 = 234.45F;
    var2 = 234.45;
     
    System.out.println("var1 = "+var1);
    System.out.println("var2 = "+var2);
  }
}

Program code results:

var1 = 234.45
var2 = 234.45

At the beginning of the program code, I declare a variable var1 of type float, and variable var2 of type double. Then in lines 7-8, these two variables are filled with numbers 234.45.

Notice how to fill in the variable var1, there is a suffix "F", i.e. 234.45F. This is necessary because by default all fractional numbers in Java are considered double.

Finally these two variables are displayed with the System.out.println() command in lines 10 and 11.

The suffix "F" for this float data type input process must be written, otherwise there will be an error like the following example:

class HelloWorld {
  public static void main(String args[]){
     
    float  var1;
    double var2;
 
    var1 = 234.45;  // an error occurred here
    var2 = 234.45;
     
    System.out.println("var1 = "+var1);
    System.out.println("var2 = "+var2);
  }
}

java_float_error_compiler

In this case the Java compiler refuses because there is a conversion process from double to float.

Writing fractional numbers can also use scientific notation, such as 3.12e2 or 4E-3. The character e or E represents the rank of 10, so 3.12e2 = 3.12 x 102 = 312. Whereas 4E-3 = 4 x 10-3 = 0.004. Here is an example:

class HelloWorld {
  public static void main(String args[]){
 
    float var1;
    double var2;
 
    var1 = 3.12e2F; 
    var2 = 4E-3;
 
    System.out.println("var1 = "+var1);
    System.out.println("var2 = "+var2);
  }
}

Program code results:

var1 = 312.0
var2 = 0.004

How to read (input) Double and Float Data


To input double and float data type processes, you can also use the Scanner class by using the following input commands:
  • nextFloat ()
  • nextDouble ()
Also to avoid punctuation problems, this input process should also include the Locale class. Here's an example:

import java.util.Scanner;
import java.util.Locale;
 
class HelloWorld {
  public static void main(String args[]){
     
    Scanner input = new Scanner(System.in).useLocale(Locale.US);
     
    float  var1;
    double var2;
 
    System.out.print("var1 (float): ");
    var1 = input.nextFloat();
     
    System.out.print("var2 (double): ");
    var2 = input.nextDouble();
     
 
    System.out.println();
    System.out.println("## Result ##");
     
    System.out.println("var1 = "+var1);
    System.out.println("var2 = "+var2);  
  }
}

java_float_double_input_example

At the beginning of the program code, there is a code for importing java.util.Scanner and java.util.Locale. This Locale class is needed during the Scanner class initiation process inline 7. It functions so that the input process uses the American system (US), which uses a dot as a fraction separator.

So to be uniform, we just set it with the US system. The reading process itself is carried out in lines 13 and 16 for the float data type and double data type.

So, should you use float or double data types?


For general use, you should only use double. Aside from being larger in scope, double is also the default fraction data type from Java, so we don't need to add the "F" suffix when we want to fill values into variables.

Saturday, May 23, 2020

How To Install Android Studio

new_android_studio

At present, a lot of smart electronic devices are driven by the Android operating system. The most significant use is on smartphones. Android is a Linux-based operating system developed by Google. The massive number of android users is certainly a good opportunity for developers to provide applications for the operating system.

If you already familiar with the programming language, of course know how to work with Eclipse IDE for Java developers. However, to develop an Android application, you are strongly advised to use Android Studio. Here's how to install Android Studio:

  1. Android studio overview
  2. Android studio features
  3. Why use android studio?
  4. Things you need to be prepared to install android studio
  5. How to install android studio

Android studio overview


Before going to the section on how to install Android Studio, we start by getting to know this amazing IDE. So, in 2013, Google announced the presence of Android Studio. However, only in 2014 Google officially released Android Studio in beta as the Integrated Development Environment (IDE) for Android application development.

The use of Android Studio certainly maximizes the performance of developers in developing their best applications since it focuses on the Java programming language. Unlike the Eclipse IDE which includes various programming languages.

Until now, Google has developed several versions of Android Studio. As of this writing, the latest version is Android Studio 3.6.3. This latest version is supported with various features to optimize the performance of Android Studio. While the older version is Android Studio 2.3, 3.0.1, 3.0.4, and others.

With Android Studio, you can create attractive interfaces and manage files easily. You can also have direct access to the Android Software Development Kit (SDK) so that the application can run smoothly on all versions of Android devices.

Simply put, you only need to write, edit, and save the worksheet along with the required files. At the time of the coding process, Android Studio will advise on the relevant codes.  That way, you can save time when coding.

Android studio features


Here is a list of Android studio features:

  • The drag-and-drop layout editor.
  • Powerful emulators with various features.
  • Dynamic Gradle-based version system.
  • The Template feature helps you determine Android designs and components.
  • ProGuard integration.
  • Lint Tools support to check performance, version compatibility, usability, and other problems.
  • The Refactoring feature serves Android-specific flash repairs
  • Support C ++ and NDK.
  • Integrated with Google Cloud Messaging and App Engine.
  • Supports for Android TV and Android Wear applications.
  • The Android Studio Environment is simply designed to make it easier to develop Android applications.

Why use android studio?


With a myriad of features offered by Android Studio, so Google makes it the official IDE for android application development. However, you can also use other Android development according to your abilities. Here are two alternative Android development:

Xamarin
Xamarin can be chosen if you are familiar with C# Language. This software developed by Microsoft will help you to become a capable mobile developer.

Ionic
Ionic was developed to help web developers who want to expand into the world of mobile developers. By using ionic, we can create Android applications with web technology.

Things you need to be prepared to install android studio


Before you rush to download and install Android Studio, make sure the JDK has been installed before. Read here on How To Install Java JDK and JRE. Next, pay attention to some things related to hardware compatibility to install android studio. Below are the things that need to be prepared before installing android studio:

Windows
Android Studio can operate with Windows 32- and 64-bit versions, 7.8 or 10. Windows users who want to install android studio must make sure their device has the following requirements:

  • The minimum computer screen resolution is 1280 X 800.
  • Make sure the available disk space is not less than 2GB (500MB for IDE and 1.5GB for android SDK and image system emulator). However, we recommend that you set aside 4GB of space so that your windows device continues to run smoothly.
  • Make sure the device is supported with at least 3GB or 8GB of RAM. 1GB of RAM will be used for the android emulator.
  • The 64-bit operating system and Intel® support Intel® VT-x processor, Intel® EM64T (Intel® 64), and Execute Disable (XD) Bit functionality are useful for acceleration emulators.

Mac OS
For Apple users, make sure the following are met:

  • Make sure your device is using the Mac® OS X® 10.10 (Yosemite) version or above.
  • Minimum screen resolution of 1280 x 800.
  • Minimum RAM of 3GB. However, it would be better if 8GB with an additional 1GB for the android emulator.
  • Provide a minimum of 2GB of disk space with an estimated usage of 500MB for the IDE and 1.5GB for the android SDK and emulator system.

Linux
The following requirements must be met when wanting to install Android Studio on Linux:

  • Linux-based computers must have a GNOME or KDE desktop that has been tested by Ubuntu® 12.04, Precise Pangolin (a 64-bit distribution capable of operating 32-bit applications).
  • Also make sure the device is supported by GNU C Library (Glibc) version 2.19 or updated version.
  • The screen resolution must also be 1280 X 800
  • Provide at least 2GB of disk space.
  • Android Studio requires a minimum of 3GB. But we recommend using 8GB of RAM so that Android Studio runs smoothly. Do not forget to add 1GB of RAM which will be used for the Android emulator.
  • For emulator speed, at least Intel® Processors with Intel® VT-x support, Intel® EM64T (Intel® 64), and Execute Disable (XD) Bit functionality, or AMD processors with AMD Virtualization ™ (AMD-V ™) support are needed.

How to install android studio


After your hardware device meets the above requirements, it is time for you to know how to install Android Studio. Here we will describe how to install Android Studio:

  • Visit the official Android studio website at https://developer.android.com/studio to download the latest installer file. Check the mark for agreeing to the terms and conditions so that Android Studio can be downloaded. Then you can follow the instructions until the download process is complete.
  • After the download is complete, run the installer file. The file will automatically be verified so wait until the process is complete.
  • On the Setup menu, click next to install Android Studio. Then in the Choose Component menu, check Android Studio, Android SDK, and Android Virtual Device then click next.

  • Setelah memilih semua komponen yang akan diinstal, lanjut ke jendela License Agremeent. Klik saja pada kotak I Agree.
  • Tahap selanjutnya adalah tentukan lokasi penyimpanan Android Studio beserta SDKnya. Secara default, file instalasi tersebut akan tersimpan di Local Disk (C).

  • Next, click install. Check the Do not Create Shortcuts option if you want.

  • Wait until the installation process is complete. Click next and click finish while the Android Studio Start menu is still checked.

  • In the next window, there are 2 options. The first choice is for those who have previously installed the Android Studio IDE. If you have never installed it, then check the second option. Don't forget to click OK so you can move to the next process.
  • When you check the second option, then you will see a Welcome window. Choose the next menu.
  • After that, select the standard type install option then click next.
  • Then, the SDK Components Setup window will appear. There are several SDK components to choose from. Just check the components to be installed then click next.
  • The next step is Verify Settings. Click finish and the component download process will begin.
  • After the download process is complete, it means that the installation of Android Studio is complete. Therefore click finish.
  • After a long installation process, you will be greeted with a Welcome to Android Studio window. Now, you can run it.

That's the full review of Android Studio and how to install Android Studio. Android Studio is the official Android development from Google. Android developers, both beginners and experienced, are expected to be able to create various types of Android applications using this IDE.