Friday, September 4, 2020

Types Of Operators In Java


types_operators_java


Operators in java programming are used to perform certain operations. Suppose we want to add the values of the variables x and y, then we can use the addition operator (+).

x + y

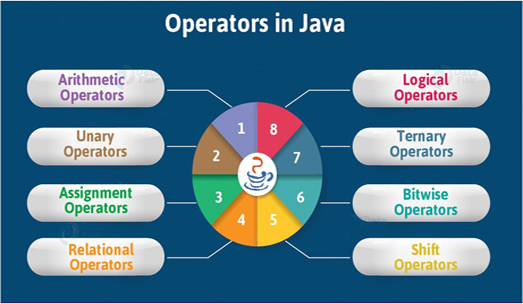
There are six types of operator in Java programming:
  • Artimatic Operators
  • Assignment Operators
  • Comparison Operators
  • Logical Operators
  • Bitwise Operators
  • and Ternary Operators
1. Arithmetic Operators

Arithmetic operators are operators that we usually find for mathematical operations. Arithmetic itself is a branch of mathematics which discusses simple calculations such as times, divide, add and less.

Apart from these four operations, the Java language also has the modulo division operation, or operator % which is used to find the remainder of the quotient.

The following table summarizes the arithmetic operators in the Java programming language:

NAME SYMBOL
Addition +
Substraction -
Multiplication *
Division /
Modulus %


How to use it?

Create a new class named Arithmetic Operators, then type following code:

import java.util.Scanner;

public class ArithmeticOperators {

    public static void main(String[] args) {
        int num1;
        int num2;
        int result;

        Scanner keyboard = new Scanner(System.in);

        System.out.print("Input number 1: ");
        num1 = keyboard.nextInt();
        System.out.print("Input number 2: ");
        num2 = keyboard.nextInt();

        // addition
        result = num1 + num2;
        System.out.println("Result = " + result);

        System.out.print("Input number 1: ");
        num1 = keyboard.nextInt();
        System.out.print("Input number 2: ");
        num2 = keyboard.nextInt();

        // subtraction
        result = num1 - num2;
        System.out.println("Result = " + result);

        System.out.print("Input number 1: ");
        num1 = keyboard.nextInt();
        System.out.print("Input number 2: ");
        num2 = keyboard.nextInt();

        // multiplication
        result = num1 * num2;
        System.out.println("Result = " + result);


        System.out.print("Input number 1: ");
        num1 = keyboard.nextInt();
        System.out.print("Input number 2: ");
        num2 = keyboard.nextInt();

        // Division
        result = num1 / num2;
        System.out.println("Result = " + result);

        System.out.print("Input number 1: ");
        num1 = keyboard.nextInt();
        System.out.print("Input number 1: ");
        num2 = keyboard.nextInt();

        // Remainder
        result = num1 % num2;
        System.out.println("Result = " + result);

    }

}

Program result:

Input number 1: 3
Input number 2: 4
Result = 7
Input number 1: 6
Input number 2: 4
Result = 2
Input number 1: 3
Input number 2: 4
Result = 12
Input number 1: 8
Input number 2: 2
Result = 4
Input number 1: 24
Input number 1: 5
Result = 4

2.Assignment Operator  

Assignment operators are operators that are used to assign values to a variable. In Java, the assignment operator uses an equal sign "=". Later there will also be compound assignment operators, such as "+ =", "- =", etc.

Example:

int a = 10;

The variable a is assigned to store the value 10.

The Assignment Operators consist of:

OPERATOR EXAMPLE SAME AS
= x = 5 x = 5
+= x += 3 x = x + 3
-= x -= 3 x = x - 3
*= x *= 3 x = x * 3
/= x /= 3 x = x / 3
%= x %= 3 x = x % 3
&= x &= 3 x = x & 3
|= x |= 3 x = x | 3
^= x ^= 3 x = x ^ 3
>>= x >>= 3 x = x >> 3
<<= x <<= 3 x = x << 3


Now, create a new class named Assignment Operator.

public class AssignmentOperator {

    public static void main(String[] args) {
        int a;
        int b;

        // value assignment
        a = 5;
        b = 10;

        // addition
        b += a;
        // now b = 15
        System.out.println("Addition : " + b);

        // subtraction
        b -= a;
        // now b = 10 (15-5)
        System.out.println("Subtraction : " + b);

        // multiple
        b *= a;
        // now b = 50 (10*5)
        System.out.println("Multiple : " + b);

        // Division
        b /= a;
        // now b=10
        System.out.println("Division : " + b);

        // Remainder
        b %= a;
        // now b=0
        System.out.println("Remainder: " + b);

    }

}

Program result:

Addition : 15
Subtraction : 10
Multiple : 50
Division : 10
Remainder: 0

3. Comparison Operators

The comparison operator is used to compare 2 values, whether the values are equal, smaller, larger, etc.. The result of this comparison operator is a boolean True or False.

The following table summarizes the results of the comparison operators in Java:

Operator Explanation Example Result
== Equal to 5 == 5 true
!= Not equal 5 != 5 false
> Greater than 5 > 6 false
< Less than 5 < 6 true
>= Greater than or equal to 5 >= 3 true
<= Less than or equal to 5 <= 5 true


The following is an example of a comparison operator program code in Java:

public class LearnJava {
  public static void main(String args[]){
       
    int a = 10;
    int b = 5;
    boolean result;
    
    result = a == b;
    System.out.println("a == b? " + result );   
    
    result = a != b;
    System.out.println("a != b ? " + result );   
    
    result = a > b;
    System.out.println("a > b ? " + result );   
    
    result = a < b;
    System.out.println("a < b ? " + result );   
    
    result = a >= b;
    System.out.println("a >= b ? " + result );   
 
    result = a <= b;
    System.out.println("a <= b ? " + result );   
    
  }
}

Program result:

a == b? false
a != b ? true
a > b ? true
a < b ? false
a >= b ? true
a <= b ? false

4. Logical Operators

Logical operators are used to return true or false boolean values of 2 or more conditions. The following table summarizes the results of the logical operators in the Java language:

Operator Name Description Example
&& Logical and Returns true if both statements are true x < 5 && x < 10
|| Logical or Returns true if one of the statements is true x < 5 || x < 4
! Logical not Reverse the result, returns false if the result is true !(x < 5 && x < 10)

public class LearnJava {
  public static void main(String args[]){
       
    boolean a = true;
    boolean b = false;
    boolean result;
    
    result = a && b;
    System.out.println("Result a && b : " + hasil );   
    
    result = a || b;
    System.out.println("Result a || b : " + hasil );   
    
    result = !b;
    System.out.println("Result !b : " + hasil );  
    
  }
}

Program result: 

Result a && b : false
Result a || b : true
Result !b : true

5. Bitwise Operators

Bitwise operators are operators used for bit (binary) operations.

Bitwise operators consist of:

Name Symbol
AND &
OR |
NOT ~
XOR ^
Zero-fill left shift <<
Signed right shift >>
Zero-fill right shift >>>


The concept is almost the same as the Logic operator. The difference is, Bitwise is used for binary.

Let's try it in a program..Create a new class with the name OptBitwise, then copy below code:

public class OptBitwise {

    public static void main(String[] args) {
        int a = 60;    /* 60 = 0011 1100 */
        int b = 13;    /* 13 = 0000 1101 */
        int c = 0;

        c = a & b;       /* 12 = 0000 1100 */
        System.out.println("a & b = " + c);

        c = a | b;       /* 61 = 0011 1101 */
        System.out.println("a | b = " + c);

        c = a ^ b;       /* 49 = 0011 0001 */
        System.out.println("a ^ b = " + c);

        c = ~a;          /*-61 = 1100 0011 */
        System.out.println("~a = " + c);

        c = a << 2;     /* 240 = 1111 0000 */
        System.out.println("a << 2 = " + c);

        c = a >> 2;     /* 215 = 1111 */
        System.out.println("a >> 2  = " + c);

        c = a >>> 2;     /* 215 = 0000 1111 */
        System.out.println("a >>> 2 = " + c);
    }

}

Program result: 

a & b = 12
a | b = 61
a ^ b = 49
~a = -61
a << 2 = 240
a >> 2  = 15
a >>> 2 = 15

6. Ternary Operators

The ternary operator is an operator that consists of 3 operands. In Java, this ternary operator uses a question mark (?)aAnd a colon (:) to separate the answer.

Here is an example of using ternary operators in the Java programming language:

class OptTernary {
  public static void main(String[] args) {

        boolean like = true;
        String answer;

        // using ternary operators
        answer = like ? "yes" : "no";

        // displays answers
        System.out.println(answer);

    }
}

Program result:

yes


We have studied the various types of operators in Java programming.

Yes, operators are very closely related to mathematics. Therefore, programmers are required to be able to do mathematics.

Monday, August 31, 2020

Learn For Loop in Java with example

for_loop_in_java
In the Java programming (as well as C derived languages such as C ++, PHP and JavaScript), there are 3 loop structures, namely the for loop, the while loop and the do while loop.

So, here we will discuss the for loop first.

Understanding Loop Structure For Java Language

Loop is a program code instruction that aims to repeat several lines of commands. In designing a for loop, we need to know at least 3 components:
  • The initial condition of the loop.
  • Condition at the time of looping.
  • The conditions that must be met for the loop to stop.
The basic format for the for loop structure in Java programming is as follows:

for (start; condition; increment) 
{
   // code here
   // code here
}

Start is a condition at the beginning of the loop. Usually this initial condition contains a command to assign a value to the counter variable. The counter variable itself is a variable that determines how many loops are performed. Most programmers use the variable i as a counter variable (this is not necessary, you can also use other variables).

As long as the conditions are met to running the loop , the Java language compiler will continue looping. For example, the condition contains the command i < 7, so as long as the "i" variable contains a number less than 7, then the program will keep looping.

Increment is the part that is used to process the counter variable so that it can fulfill the final loop condition. This section will always be executed on every loop.

It is called an increment because it usually contains increment operations such as i ++, which is actually the same as i = i + 1. That is, in each loop, the variable i will raise by 1 digit. But we can also give other values such as i = i + 2 so that the counter variable will increase by 2 digits per iteration

In addition, there is the term iteration (iteration), which means 1 iteration. This term is used quite often when discussing loop structures.

Example of looping program code for Java language.

As the first example, I want to display the text “Hello World” 5 times. Here's the program code:

class LearnJava {
  public static void main(String args[]){
     
    int i; 
    for (i = 1; i < 5; i++) { 
      System.out.println("Hello World "); 
    }
   
  }
}

In line 4, I create a variable "i" which is set as the integer data type. This variable will later be used as a counter variable, which is a variable that determines the final state of the loop.

The command at line 5, namely for (i = 1; i <5; i ++), can be read:

"Run the loop, starting from variable i = 1 to i < 5. In each iteration, increase the value of the i variable by 1 digit using the i++ command".

Here are the results:

Hello World
Hello World
Hello World
Hello World

The question is, why only 4 lines of “Hello World” appear? Even though we repeat from i = 1 to i < 5.

This has to do with the use of signs. The final condition of the loop is i < 5, which means that it will always be true if i is less than 5, but if it reaches 5 then the condition becomes false and the loop stop.

There are 2 alternatives to make the "Hello World" can come out 5 times. You can change the initial condition to i = 0, or change the final condition to i <= 5. The second option looks better:

class LearnJava {
  public static void main(String args[]){
     
    int i; 
    for (i = 1; i <= 5; i++) { 
      System.out.println("Hello World "); 
    }
  }
}

Program code results:

Hello World
Hello World
Hello World
Hello World
Hello World

Now the "Hello World" has appeared 5 times. Again, be careful using java comparisons, especially between "<" and "<=".

Inside the loop, we can also access the counter variable like this:

class LearnJava {
  public static void main(String args[]){
     
    int i; 
    for (i = 1; i <= 5; i++) { 
      System.out.println("Hello World "+i); 
    }
   
  }
}

Program code results:

Hello World 1
Hello World 2
Hello World 3
Hello World 4
Hello World 5

Now on the side "Hello World" text, there are the number from the variable value i. Because in each iteration the counter variable i will increase by 1 point (increment process), so when it is displayed it will also increase by 1 point for each iteration.

The counter variable i also doesn't have to be incremented, but it can also be decremented to make the loop decrease. Here's an example:

class LearnJava {
  public static void main(String args[]){
     
    int i; 
    for (i = 5; i >= 1; i--) { 
      System.out.println("Hello World "+i); 
    }
   
  }
}

Program code results:

Hello World 5
Hello World 4
Hello World 3
Hello World 2
Hello World 1

Our code is very similar as before, but pay attention to the for command on line 5: for (i = 5; i> = 1; i–). This can be read:

"Run the loop, starting from the variable i = 5 to i> = 1. In each iteration, decrease the value of the variable i by 1 digit using the command i--".

As a result, the value of the counter variable i will decrease by 1 digit in each iteration.

As a final example, can you make a loop to show the multiple of 3 10 times? The final result we want is as follows:

3 6 9 12 15 18 21 24 27 30

There are several ways to produce this sequence. First, change on the side of the command block to be executed where the counter variable i keeps increasing from 1 to 10:

class LearnJava {
  public static void main(String args[]){
     
    int i; 
    for (i = 1; i <= 10; i++) { 
      System.out.print(i*3 + " "); 
    }
   
  }
}

In order to produce a number that increases by a multiple of 3, the technique used is to multiply the value of the counter variable i by the number 3 for each iteration.

The second way is to modify the increment process of the counter variable:

class LearnJava {
  public static void main(String args[]){
     
    int i; 
    for (i = 3; i <= 30; i = i + 3) { 
      System.out.print(i + " "); 
    }
   
  }
}

Note the for loop command on line 5. The for command (i = 3; i <= 30; i = i + 3) can be read:

"Run the loop, starting from the variable i = 3 to i <= 30. In each iteration, increase the value of the variable i by 3 digits using the command i = i + 3".

This technique is rarely used, but it can be done.

In today's tutorial we have discussed the for loop. Later, these loops can be further combined, for example to create nested loops.

But for the next tutorial, we will continue with the second form of loop in Java, namely the WHILE loop.

Friday, June 5, 2020

Casting And Type Conversion in Java

type_conversion_and_casting_java

In the Java programming language, Type Casting is used to determine and change a value from one data type to another data type. For example, if we have variable A with Integer data type, then we can determine the value of variable A to be float data type or vice versa. There are 2 types of Type Casting in Java called Implicit Casting and Explicit Casting.

Both are used to change the value of one data type variable. The difference between the two types is, Implicit is used to change from small data types to large data types, for example, Bytes to Long or Short to Double.

Widening Conversion (Implicit Casting)


Implicit Casting is used to convert values from small data types to large data types, such as the following:
  • From short data types to int, long, float, or double data types
  • From int data types into long, float, or double data types
  • From char data types into int, long, float, or double data types
  • From float data types into double data types
  • From long data types or into float or double data types
  • From byte data type to short, int, long, float, or double data types
Example of an Implicit Casting program in Java:


public class HelloWorld {
    public static void main(String[] args){
        
        short data1 = 457;
        double double_data = data1; //short to double
        
        char data2 = 'W';
        long long_data = data2;//char to long
        
        int  data3 = 456;
        float int_data = data3;// int to float
        
        byte data4 = 127;
        long long_data2 = data4;//byte to long
        
        float data5 = 565.3f;
        double double_data2 = data5;//float to double
        
        System.out.println("Short to Double: "+ double_data);
        System.out.println("Char to Long: "+long_data);
        System.out.println("Int to Float: "+int_data);
        System.out.println("Byte to Long: "+long_data2);
        System.out.println("Float to Double: "+double_data2);
    }
}

Result:

implicit_casting_java

Narrow Conversion (Explicit Casting)


Explicit Casting is the opposite of Implicit Casting, which is to change values from large data types to small data types, such as:
  • From short data types to bytes or char
  • From double data types to bytes, short, char, int, long or float
  • From char data types to bytes or short
  • From long data types to bytes, short, char or int
  • From int data types to bytes, short, or char
  • From float data type to byte, short, char, int or long
  • From byte data type into the char data type

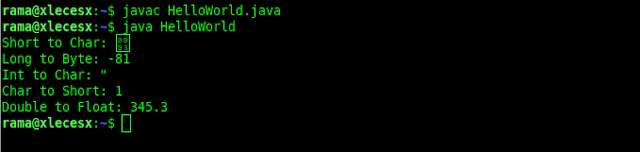
Examples of Explicit Casting programs in Java:


public class HelloWorld {
    public static void main(String[] args){
        
        short data1 = 3;
        char char_data = (char) data1; //short to char
        
        long data2 = 246447;
        byte byte_data = (byte) data2;//long to byte
        
        int  data3 = 34;
        char char_data2 = (char) data3;// int to char
        
        char data4 = 1;
        short short_data2 = (short) data4;//char to short
        
        double data5 = 345.3;
        float float_data2 = (float) data5;//double to float
        
        System.out.println("Short to Char: "+ char_data);
        System.out.println("Long to Byte: "+byte_data);
        System.out.println("Int to Char: "+char_data2);
        System.out.println("Char to Short: "+short_data2);
        System.out.println("Double to Float: "+float_data2);
    }
}

Result:

explicit_casting_java

What is important in the process of casting and conversion in Java is known beforehand about the type of data in java.

Wednesday, June 3, 2020

Understanding Exception Handling In Java Programming With Examples

exception_handling_in_java


If the Java Virtual Machine (JVM) detects that an operation is not possible, a runtime error will appear during the program runs.

For example, if you are accessing an array using the index out of the bonds, then you will get a runtime error ArrayIndexOutOfBoundsException. Or suppose when you enter a value of type double, but your program is designed for integer values, then you will get a runtime error InputMismatchException.

In Java programs, this runtime error will be thrown as exceptions. These exceptions are also objects that represent an error or condition that prevents the execution from running normally. If an exception is not handled, then the program will stop abnormally.

The question is, how do you handle exceptions so that the java program can continue or stop properly?

Exception handling is an important part of writing powerful Java applications.

Therefore, exception handling is a non-functional requirement for any application. Aims to deal with conditions where errors occur properly such as resources that are not available, invalid input, null input, and so forth.

Java provides several features for handling exceptions built-in in the form of keyword try, catch and finally. The Java programming language also allows you to create new exceptions and throw them using keyword throw and throws.

Exception Handling Overview


Exceptions are thrown from a method. The caller of the method can catch and handle the exception.

To understand handing exceptions, see the sample code below:

import java.util.Scanner;

public class Division {
 
 public static void main(String[] args) {
  
  Scanner input = new Scanner (System.in);
  
  // ask the user to enter two integer numbers
  System.out.println("Enter two integers: ");
  int number1 = input.nextInt();
  int number2 = input.nextInt();
  
  System.out.println("Results of " + number1 + " divided " + number2 
    + " is: " + (number1/number2));
  
 }

}

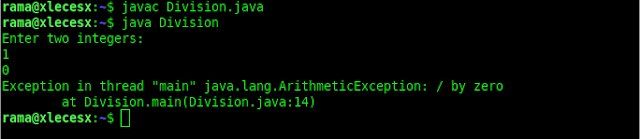
In the java code above, when the user enters the number 0 in the second number, then a runtime error will occur because the integer cannot be divided by the number 0. For example the output example below:

number_exception_java

A simple way to overcome this problem is to use the conditional if, as in the following example:

import java.util.Scanner;

public class DivisionWithIf{
 
public static void main(String[] args) {
  
  Scanner input = new Scanner (System.in);
  
  // ask the user to enter two integer numbers
  System.out.println("Enter two integers: ");
  int number1 = input.nextInt();
  int number2 = input.nextInt();
  
  if(number2 != 0){
  System.out.println("Results of " + number1 + " divided " + number2 
    + " is: " + (number1/number2));
  }else{
   System.out.println("The divisor number cannot be zero!");
  }
 }

}

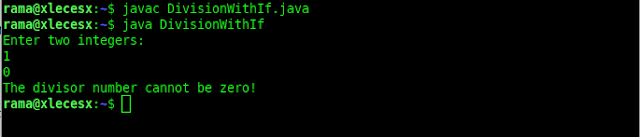
Example output:

exception_with_if_java

Before going any further in java exception handling, the above code can be rewritten using a method for division like the example below:

import java.util.Scanner;

public class DivisionWithMethod {
 
 // Static method for calculating division results
 public static int calculateDivision(int number1, int number2){
  if(number2 == 0){
                 System.out.println("The divisor number cannot be zero!");
   System.exit(1);
  }
  return (number1/number2);
 }
 
 public static void main(String[] args) {
  Scanner input = new Scanner (System.in);
  
  // ask the user to enter two integer numbers
  System.out.println("Enter two integers: ");
  int number1 = input.nextInt();
  int number2 = input.nextInt();
  
  int result = calculateDivision(number1, number2);
  
  System.out.println("Results of " + number1 + " divided " + number2 
    + " is: " + (number1/number2));
 }

}

In the above code, the method inline (6-12) will return the results of the division of two integers. If the second number is 0 as the divisor, the program will be terminated on line 9.

This is a problem, because you shouldn't have created a method to stop the program.

So, how can a method notify the caller that an exception has occurred? Java allows a method to throw an exception that can be caught and handled by the caller.

So the code above can be rewritten as:

import java.util.Scanner;

public class DivisionWithException {
 
 // Static method for calculating division results
 public static int calculateDivision(int number1, int number2){
  if(number2 == 0){
    
   throw new ArithmeticException("The divisor number cannot be zero!");
  }
  return (number1/number2);
 }
  
 public static void main(String[] args) {
  
  Scanner input = new Scanner(System.in);
  
  // ask the user to enter two integer numbers
  System.out.println("Enter two integers: ");
  int number1 = input.nextInt();
  int number2 = input.nextInt();
  
  try{
   int result = calculateDivision(number1, number2);
   
   System.out.println("Results of " + number1 + " divided " + number2 
    + " is: " + (number1/number2));
  }
  
   catch (ArithmeticException exception){
    System.out.println("Exception: An integer "
      + "cannot be divided by zero!");
  }
  
  System.out.println("Program execution continues ...");
 }

}

In the java code above, if the second number or the divisor is 0, then the method will throw an exception at line 9:

throw new ArithmeticException ("The divisor number cannot be zero!");

The value threw, in this case, is new ArithmeticException ("The divisor number cannot be zero!"); called an exception. Whereas the execution of the throw statement is called throwing an exception.

An exception object is an object created from the Exception class. In this case, the Exception class is java.lang.ArithmeticException.

With a hierarchy:

java.lang.Object 
      java.lang.Throwable 
          java.lang.Exception 
              java.lang.RuntimeException 
                  java.lang.ArithmeticException

ArithmeticException (String s) constructor is called to construct an exception object. Where String s is a message that explains about exceptions.

When an exception is thrown, then the normal execution flow will be interrupted. Like the term "throw an exception" which means to pass an exception from one place to another.

Try And Catch Blocks


The statement to call the method is contained in a try and catch block. The try block on lines 23 - 28 contains the code to run under normal circumstances.

Meanwhile, the exception will be caught by the catch block on lines 30 - 33. So the code contained in the catch block aims to handle the exception.

Then statement on line 35 will be executed after the catch block is executed.

This throw statement can be analogous to method calls. However, it is not a method that is called, but a catch block.

In this case, a catch block is like a method definition with parameters that match the type of value being thrown. Unlike the method, however, after the catch block is executed, the program control does not return to the throw statement, but will continue to execute the next statement after the catch block.

Block Catch Parameter


On line 30:

catch (ArithmeticException exception)

An exception identifier acts the same as a parameter in a method. Thus, this parameter is referred to as a catch block parameter.

The ArithmeticException above, which was written before the exception is to determine what types of exceptions can be caught by the catch block. Once an exception is captured, then you can access the value thrown from this parameter in the body of the catch block.

In summary, a template of the try-throw-catch block will look like below:

try {
  //Code to run;
  //A statement or method that might throw an exception;
  //Other codes to run;
}
catch (type exception) {
  //Code for processing exceptions;
}

An exception might be raised directly by using the throw statement inside the try block. Or you can also use methods that can throw exceptions.

On line 24, the main method calls calculateDivision(). If the calculateDivision() method runs normally, it returns a value to the caller.

Conversely, if the calculateDivision method finds an exception, it throws the exception back to the caller. Then the catch block of the caller will handle the exception.

Advantages of Using Exception Handling in Java


Now you can see the benefits of using exception handling in java. The advantage is that it allows a method to throw an exception at the caller and allows the caller to handle the exception.

Without these capabilities, the method that is called itself must handle exceptions or terminate the program. Often the method called does not know what to do when an error occurs. This is a typical case for library methods. The library method can detect errors but only the caller can identify what to do when an error occurs.

The main benefit of exception handling is that it separates detection of errors from handling errors.

Many library methods throw exceptions. Following is an example of handling InputMismatchException when reading an input.

import java.util.Scanner;

public class TestInputMismatchException {
 
 public static void main(String[] args) {
  Scanner input = new Scanner(System.in);
  boolean continueInput = true;
  
  do{
   try{
    System.out.print("Enter an integer: ");
    int number = input.nextInt();
    
    //Showing results
    System.out.println("The number entered is "+ number);
    continueInput = false;
   }
   
   catch(InputMismatchException ex){
    System.out.println ("Try again. (Invalid input: An integer is required)");
    input.nextLine();
   }
  }while(continueInput);

 }
}

When executing input.nextInt() on line 12, an InputMismatchException occurs if the user enters a number that is not an integer.

For example, the value 2.9 is inputted, then InputMismatchException occurs and program control will be moved to the 19-22 catch line block. The statements in the block will be executed.

The input.nextLine() statement on line 21 will destroy the current input line and then the user can input the new line.

The variable continueInput controls the loop. The initial value is true on line 7 and when a valid value is received, then it converted to false on line 16. When a valid input value is received, there is no need to continue input numbers.

Wednesday, May 27, 2020

Float and Double Data Type Java Language With Example

float_double_java

Float and double data types are fractional number data types. This time we will discuss the difference between float and double in java programming.

Definition of float and double data types in java language


Float and double data types are used to hold fractional numbers such as 3.14, 44.53, or -0.09876. Just like programming languages in general, we use periods as separators of integers and fractions.

The difference between float and double lies in the range of numbers and the level of accuracy. The following table is the difference between float and double data types in Java:

Although float and double data types can store very large numbers, but this data type has general weaknesses as is the case in every programming language (not only Java). That is the level of accuracy. This relates to the mechanism of storage in computers that use binary numbers.

Example of java and float program code examples.

As the first example java code, I will create 2 variables of type float and double, input numbers, then display them:

class HellWorld {
  public static void main(String args[]){
     
    float  var1;
    double var2;
 
    var1 = 234.45F;
    var2 = 234.45;
     
    System.out.println("var1 = "+var1);
    System.out.println("var2 = "+var2);
  }
}

Program code results:

var1 = 234.45
var2 = 234.45

At the beginning of the program code, I declare a variable var1 of type float, and variable var2 of type double. Then in lines 7-8, these two variables are filled with numbers 234.45.

Notice how to fill in the variable var1, there is a suffix "F", i.e. 234.45F. This is necessary because by default all fractional numbers in Java are considered double.

Finally these two variables are displayed with the System.out.println() command in lines 10 and 11.

The suffix "F" for this float data type input process must be written, otherwise there will be an error like the following example:

class HelloWorld {
  public static void main(String args[]){
     
    float  var1;
    double var2;
 
    var1 = 234.45;  // an error occurred here
    var2 = 234.45;
     
    System.out.println("var1 = "+var1);
    System.out.println("var2 = "+var2);
  }
}

java_float_error_compiler

In this case the Java compiler refuses because there is a conversion process from double to float.

Writing fractional numbers can also use scientific notation, such as 3.12e2 or 4E-3. The character e or E represents the rank of 10, so 3.12e2 = 3.12 x 102 = 312. Whereas 4E-3 = 4 x 10-3 = 0.004. Here is an example:

class HelloWorld {
  public static void main(String args[]){
 
    float var1;
    double var2;
 
    var1 = 3.12e2F; 
    var2 = 4E-3;
 
    System.out.println("var1 = "+var1);
    System.out.println("var2 = "+var2);
  }
}

Program code results:

var1 = 312.0
var2 = 0.004

How to read (input) Double and Float Data


To input double and float data type processes, you can also use the Scanner class by using the following input commands:
  • nextFloat ()
  • nextDouble ()
Also to avoid punctuation problems, this input process should also include the Locale class. Here's an example:

import java.util.Scanner;
import java.util.Locale;
 
class HelloWorld {
  public static void main(String args[]){
     
    Scanner input = new Scanner(System.in).useLocale(Locale.US);
     
    float  var1;
    double var2;
 
    System.out.print("var1 (float): ");
    var1 = input.nextFloat();
     
    System.out.print("var2 (double): ");
    var2 = input.nextDouble();
     
 
    System.out.println();
    System.out.println("## Result ##");
     
    System.out.println("var1 = "+var1);
    System.out.println("var2 = "+var2);  
  }
}

java_float_double_input_example

At the beginning of the program code, there is a code for importing java.util.Scanner and java.util.Locale. This Locale class is needed during the Scanner class initiation process inline 7. It functions so that the input process uses the American system (US), which uses a dot as a fraction separator.

So to be uniform, we just set it with the US system. The reading process itself is carried out in lines 13 and 16 for the float data type and double data type.

So, should you use float or double data types?


For general use, you should only use double. Aside from being larger in scope, double is also the default fraction data type from Java, so we don't need to add the "F" suffix when we want to fill values into variables.

Friday, May 22, 2020

Integer Data Type Java Language With Example

integer_data_type_java

Today, we will discuss the understanding and how to use Integer data types in java programming language.

Understanding the Integer Type of Java Language


Integer data types are data types used to hold positive or negative integers, such as: 4, 30, and -1234. There are 4 sub-types of integers which are distinguished based on the range of numbers in the Java language:

  • byte
  • short
  • int
  • long

The following table summarizes the range of each integer data type in Java:
Data Type Storage Memory Size Range
byte 1 byte -128 to 127
short 2 byte -32,768 to 32,767
int 4 byte -2,147,483,648 to 2,147,483,647
long 8 byte< -9,223,372,036,854,775,808 to 9,223,372,036,854,775,807

Memory Storage Size is the amount of memory needed to store these numbers. The greater the range, the more memory space is needed.

The Java language also does not recognize unsigned integers like in C or C ++ languages. Unsigned is a way to sacrifice negative values to increase the range of positive numbers. That is, in Java integer data types will always have negative and positive numbers.

Example Code Program Data Type Java Integer Language

In the following program code below, I use the 4 integer data types:

class HelloWorld {
  public static void main(String args[]){
     
    byte  var1;
    short var2;
    int   var3;
    long  var4;
 
    var1 = 120;
    var2 = 32000;
    var3 = 1000000000;
    var4 = 1000000000000000L;
     
    System.out.println("var1 = "+var1);
    System.out.println("var2 = "+var2);
    System.out.println("var3 = "+var3);
    System.out.println("var4 = "+var4);    
  }
}

In rows 4 - 7, there are four variable declaration processes with different integer data types, namely byte data types for var1, short for var2, int for var3 and long for var4.

These four variables are then assigned with the values in lines 9-12, and then displayed with the System.out.println() command in lines 14-17. The following results:

var1 = 120
var2 = 32000
var3 = 1000000000
var4 = 1000000000000000

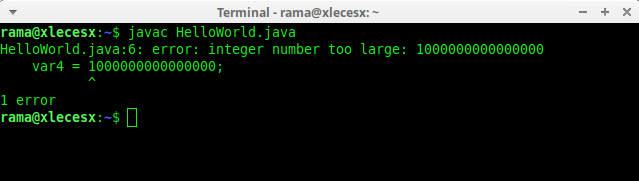
Var4 with long data type, the filling process must add the character "L" at the end, i.e. var4 = 1000000000000000L.

This additional "L" character is required because by default integers in Java are considered int. Long data types without the addition of "L" will produce an error:

class HelloWorld {
  public static void main(String args[]){
     
    long  var4;
 
    var4 = 1000000000000000;
     
    System.out.println("var4 = "+var4);    
  }
}

Error Message:

data_type_java_error

Writing Binary, Octal and Hexadecimal Numbers in Java


For certain purposes, sometimes we need to process numbers in binary, octal, and hexadecimal number systems. This can also be accommodated by Java language integer data types.

Binary is a designation for a number system consisting of 2 digits, namely 0 and 1. To input this number, add the prefix "0b" before writing the number, such as 0b10100100.

Octal is a number system consisting of 8 digit numbers, i.e., 1, 2, 3, 4, 5, 6, and 7. To make octal numbers in Java, add the prefix "0" before writing numbers, such as 0244.

Hexadecimal is a number system consisting of 16 digit numbers, i.e. 0-9 and the letter A-F. To make hex numbers in Java, add the prefix "0x" before writing numbers, like 0xA4.

Also, the everyday number system, which is 10 digits 0-9, is called a decimal number.

Here is an example program code for writing binary, octal, decimal and hexadecimal numbers in Java:

class HelloWorld {
  public static void main(String args[]){
     
    int var1, var2, var3, var4;
 
    var1 = 0b10100100;    // binary literal
    var2 = 0244;          // octal literal
    var3 = 164;           // decimal literal
    var4 = 0xA4;          // hexadecimal literal
     
    System.out.println("var1 = "+var1);
    System.out.println("var2 = "+var2);
    System.out.println("var3 = "+var3);
    System.out.println("var4 = "+var4);    
  }
}

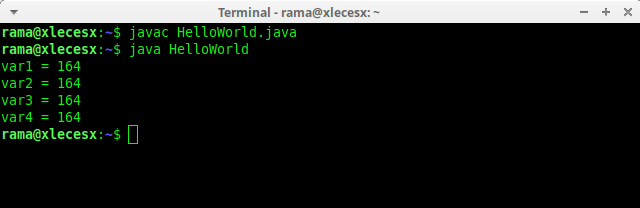
Program code results:

binary_octal_decimal_hexadecimal_java

In the program code above, I created 4 variables: var1, var2, var3, and var4 which are all set as int data types. Then in lines 6-9 these four variables are filled with numbers 0b10100100, 0244, 164, and 0xA4.

When the program results are displayed, all variables will be converted into decimal numbers. This means, binary numbers 10100100, octal 244, and hex A4 are all converted to 164 in decimal numbers.

Note: be careful with writing numbers with the leading zero, like 0123. If you write like that, then Java thinks it's a number 123 in octal format, and not the same as a decimal number 123.

In programming, Literal is a meaningful term "written directly". For example, 123 is an integer literal, 123L is a long literal, 0b10100100 is a binary literal, etc.

How To Read (input) Integer Data


The process of reading data in Java can use the Scanner class. Specifically for integer data types, the commands used for this reading process are:

  • nextByte()
  • nextShort()
  • nextInt()
  • nextLong()

The following is the program code for reading numbers (integers) in Java:

import java.util.Scanner;
 
class HelloWorld {
  public static void main(String args[]){
     
    Scanner input = new Scanner(System.in);
     
    byte  var1;
    short var2;
    int   var3;
    long  var4;
 
    System.out.print("var1 (byte): ");
    var1 = input.nextByte();
     
    System.out.print("var2 (short): ");
    var2 = input.nextShort();
     
    System.out.print("var3 (int): ");
    var3 = input.nextInt();
     
    System.out.print("var4 (long): ");
    var4 = input.nextLong();
     
    System.out.println();
    System.out.println("## Result ##");
     
    System.out.println("var1 = "+var1);
    System.out.println("var2 = "+var2);
    System.out.println("var3 = "+var3);
    System.out.println("var4 = "+var4);    
  }
}

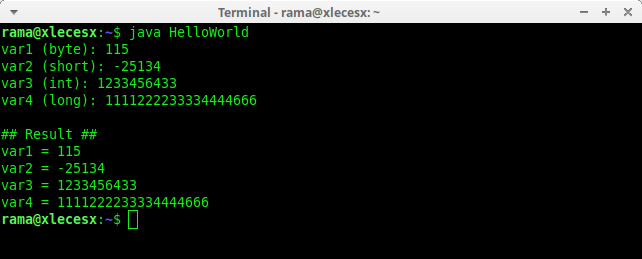
java_read_integer_data

Just like before, for this program code I declare 4 integer data types in lines 8-11. Then for each variable, we take the values from user input.

The process of reading data is done by Scanner class between lines 13-26. After the data reading process, the value is displayed at the end of the program.

In this tutorial we have discussed the definition of Java language integer data types, including how to write binary, octal, and hexadecimal numbers, and the process of reading data (input) integer data types.

Sunday, May 17, 2020

Branching Statements in Java With Example

java_branching_statements
Branching is simply a term used to refer to a branched program flow.

Branching is also known as "Control Flow", "Condition Structure", "IF Structure", "Decision", etc. Everything is the same.

Generally, the flow of code program execution is done one by one from top to bottom.

Line by line read, then the computer does as instructed.

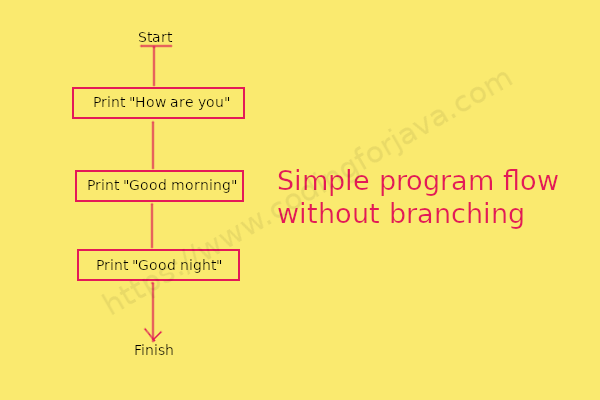
simple_program_flow_without_branching

In the diagram above, the flow is indeed one.

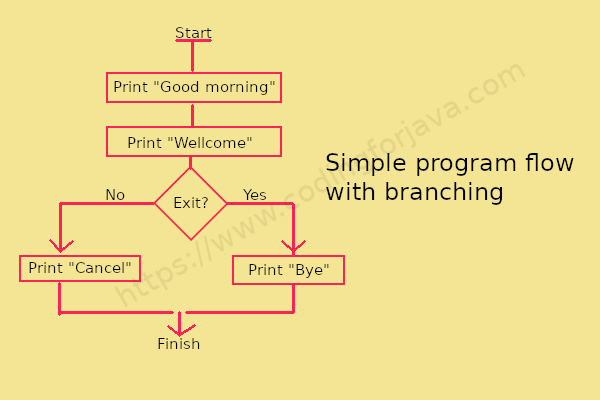
But after we use the branching, the flow will increase like this.

simple_program_flow_with_branching


Then how to write branching statements in Java?


Branching statements in java language is divided into:
  • if (simple)
  • if-else
  • if-else-if
  • switch case


If Statement


This branching has only one choice. Means, IF option will only be executed if true. Examples of IF structure formats like this:

if (kondisi){
    statement1;
    statement2;
}

Statement1 and statement2 will be executed when the condition is true. Meanwhile, when the condition is false, both statements are not executed by the program.

As an example, let's create a simple java program.
Suppose there is a bookstore. They give gifts of school supplies to buyers who are spending over USD 100.

Then we can make a program like this:

import java.util.Scanner;

public class DoorPrize {

    public static void main(String[] args) {

        // make shopping variables and scanner
        int shopping = 0;
        Scanner scan = new Scanner(System.in);

        // take user input
        System.out.print("Total Expenditures: $ ");
        shopping = scan.nextInt();

        // check whether the buyer shopping above 100
        if ( shopping > 100 ) {
            System.out.println("Congratulations, you get a prize!!");
        }

        System.out.println("Thank you...");

    }

}

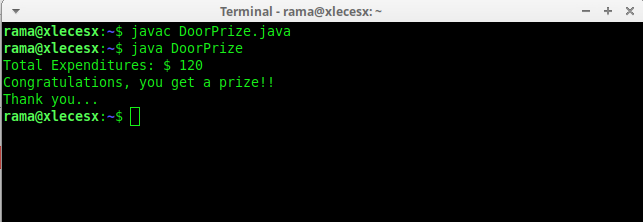
Run the program and watch the results.

example_java_program_using_if_statement

Try to give a value under 100 and watch what happens.

IF ELSE statement


In the second IF branch there is an ELSE section where there are conditions that are not met, then a statement on the ELSE section will be executed. Examples of IF structure formats like this:

if (condition){
    statement1;
    statement2;
}else {
    alternative_statement1;
    alternative_statement2;
}

Here, alternative_statement1 and alternative_statement2 inside the ELSE section will be run when the condition is false.

As an example, let's create a simple student grade java program.
For example, if a student's grade is greater than 70, then he is declared graduated. If not, then he fails.

We can make the program like this:

import java.util.Scanner;

public class StudentGrade {

    public static void main(String[] args) {

        // create a variable and Scanner
        int grade;
        String name;
        Scanner scan = new Scanner(System.in);

        // take user input
        System.out.print("Name: ");
        name = scan.nextLine();
        System.out.print("Grade: ");
        grade = scan.nextInt();

        // check whether students graduate or not
        if( grade >= 70 ) {
            System.out.println("Congratulations " + name + ", you have successfully graduated!");
        } else {
            System.out.println("Sorry " + name + ", you failed");
        }

    }

}

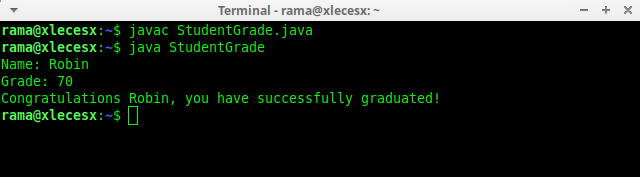
Run the program and watch the results.

simple_if_else_java_program

Try to change the input values and see what will happen.

IF ELSE IF statement


if-else-if statement is used when we need to check multiple conditions. In this statement we have only one “if” and one “else”, however we can have multiple “else if”. It is also known as if else if ladder. This is how it looks:

if (condition1) {
     statement1;
     statement2;
} else if (condition2) {
     statement3;
     statement4;
} else if (condition3) {
     statement5;
     statement6;
} else {
     alternative_statement;
}

We can see above, it has 3 conditions. The program will read the condition from top to bottom sequentially, where condition1 will be checked whether it is true? If Yes then statement1 and statement2 will be executed.

If the condition is false, it will be checked for condition2 and so on, until the condition3. If all conditions are false, then the program will execute an alternative statement in the ELSE section.

Note: The most important point to note here is that in if-else-if statement, as soon as the condition is met, the corresponding set of statements get executed, rest gets ignored. If none of the condition is met then the statements inside “else” gets executed.

Example java program using if else if statement:

import java.util.Scanner;

public class StudentGrade {

    public static void main(String args[]) {
        Scanner sc = new Scanner(System.in);
        int grade;
        System.out.print("Enter Value : ");
        grade = sc.nextInt();
        
        if (grade>=90){
            System.out.println("Very good"); 
        }else if (grade>=80){
             System.out.println("Good"); 
        }else if (grade>=70){
             System.out.println("Average"); 
        }else if (grade>=60){
             System.out.println("Minus"); 
        }else {
            System.out.println("Worse"); 
        }    
    }

}

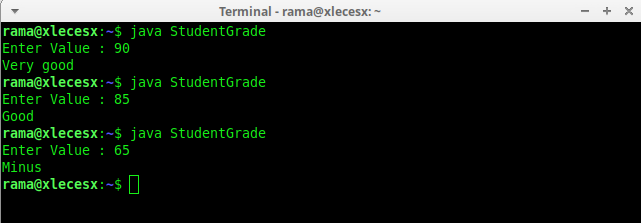
The above program makes a branching with several statements to be executed only if the conditions are met. There, I create a grade variable for the user input.

The condition checked first is the condition at the top. If the value entered is more than 90? then the output is "very good". If the condition is not met, the program will continue to the next statement where the condition is true.

Below is the program output with various grade input.

simple_if_else_if_java_program

SWITCH CASE statement 


A switch statement allows a variable to be tested for equality against a list of values. Each value is called a case, and the variable being switched on is checked for each case. The syntax structure is below:

switch (expression){
     case value:
           statement1;
         break;
     case value:
           statement2;
         break;
     case value:
           statement3;
         break;
     default :
         default_statement;
}

Example java program using SWITCH CASE statement:

import java.util.Scanner;

public class Faculty {

    public static void main(String args[]) {
        Scanner sc = new Scanner(System.in);
        int facultyCode;
        System.out.print("Enter Faculty Code : ");
        facultyCode = sc.nextInt();
        switch(facultyCode) {
          case 1: 
                 System.out.println("Information Management");
                 break;
          case 2: 
                 System.out.println("Computer Engineering");
                 break;
          case 3: 
                 System.out.println("Accounting");
                 break;
          case 4: 
                 System.out.println("International Law");
                 break;
    case 5: 
                 System.out.println("Philosophy");
                 break;
          default: 
                 System.out.println("Sorry, unavailable!!!!!!");
        }
    }
}

The program output with various input entered:

simple_switch_case_program

We have already learned several types of branching in java.

The summary is below:
  • IF, only have one choice;
  • IF / ELSE has two choices;
  • IF / ELSE / IF has more than two choices;
  • SWITCH / CASE is another form of IF / ELSE / IF;
  • Nested branching is a branching in a branching;
  • The use of logical operators in branching can make branching shorter.